Trek Pack v1 Processing
What to do once your photos have been captured...
The Trek Pack v2 is now available (June 2020). Click here for more information.
Processing</h1>
Processing Your Photos
0. Download GoPro Fusion Studio
To process photos, you’ll need to download a piece of software called GoPro Fusion Studio.
1. Import and prepare your raw photos
After shooting, copy the front and back files for each segment of the tour onto your computer using the MicroSD USB card reader.
Have a look at the photos captured.
In my case, often the first and last 20 photos will be me setting up the camera or stopping. Occasionally I am also disturbed mid-tour (usually by animals).
Before adding to GoPro Fusion I will delete any unwanted photos on my machine. Before you do this, first make sure you have a copy of the images on the MicroSD card just incase the worst should happen. Then, start deleting photo pairs (e.g. GF023401.jpg and GB023401.jpg). If you have an uneven number of photos GoPro Fusion Studio will not load the photos and show an error.
1.0.1 A note on filename format
- GF023401.jpg and GB023401.jpg: GF = front image (hold GPS info) / GB = back image
- GF023401.jpg and GB023401.jpg: The series. This will increase by 1 each time you start a new timelapse capture.
- GF023401.jpg and GB023401.jpg: Photo number. Increases by 1 with each photo taken.
This can be useful information to know when organising tours. For example, you might shoot different timelapses in different locations. In this case, the series number will help you easily identify the break-points (GoPro Fusion will also break photos like this).
2. Add raw files to GoPro Fusion
Now you have a folder of front and back images on your computer, you can add them to GoPro Fusion.
Open GoPro Fusion and select “Add Media”, and then select the location of your files.
3. Adjusting photos before stitching
3.1. Filename Settings
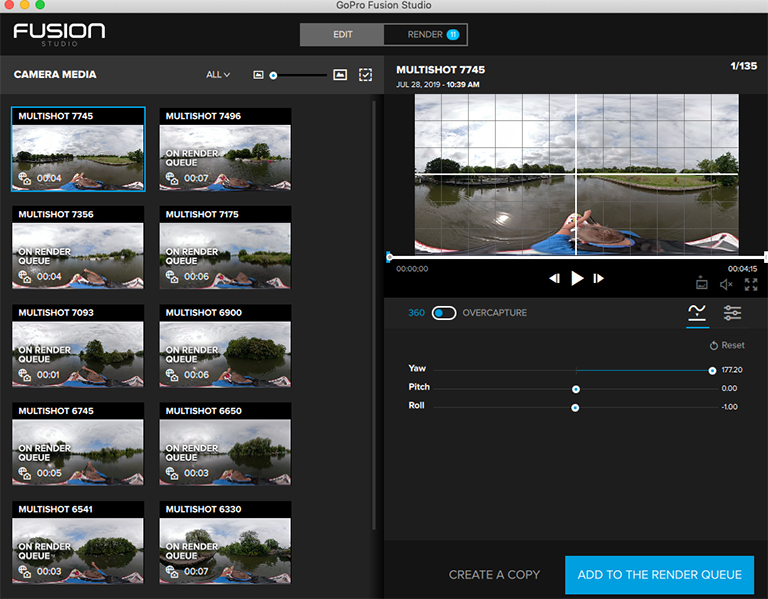
Before stitching the front and back photos to create a final panoramic photo, GoPro Fusion Studio allows you to modify some of the settings for each group of photos.
You’ll notice each timelapse sequence you captured is separated by GoPro Fusion Studio (MULTISHOT_x, MULTISHOT_y, etc.).
You can modify the prefix, but generally don’t recommend this. It makes it easier to identify/match the photos if you stick to the default, should ever need to re-render them.
3.1.1 Filename format
GoPro Fusion Studio will automatically name each timelapse sequence using the last 4 digits of the first photo in the timelapse.
For example, let’s assume the first photos in the timelapse have the filename GF023401.jpg / GB023401.jpg. In this example, that timelapse sequence will have the prefix MULTISHOT_3401 for all the photos generated (e.g. MULTISHOT_3401_000001.jpg, MULTISHOT_3401_000002.jpg, etc.)
3.2 Roll, Yaw, Pitch Settings
Once you’re photos are loaded, have a play with some of the settings.
The key ones I tend to modify are:
- Yaw: rotation around the front-to-back axis (use if camera facing left or right)
- Pitch: rotation around the side-to-side axis (use if camera facing up or down)
- Roll: rotation around the vertical axis (use if camera tilted to left or right)
In GoPro Fusion Studio use the sliders to try and line up the horizon and make sure the centre of the photos is straight ahead.

Make sure to move the time selector to different points to see if your settings look good. You might have the odd photo that was taken at a wonky angle (I have many like this where I’ve bent down or slipped) which is why checking against a larger number of photos is advisable.
The “grab a 360 photo” tool is also useful to test your modifications. It allows you to grab a single panorama of the photo currently selected.
Selecting this option will create a new entry on the left hand side for you to render. To get the single panoramic photo, you still need to render it (described in 3.3).
Using a panoramic photo viewer (e.g. Insta360 Player) you’ll be able to see if everything is level and as expected.
You might notice GoPro Fusion Studio does not stitch a 100% true panoramic photo due to small blind-spots between the two GoPro Fusion lenses. These blind-spots are virtually unnoticeable in the stitched photos, and in fact work as an advantage to ensure the photo does capture monopod stand.
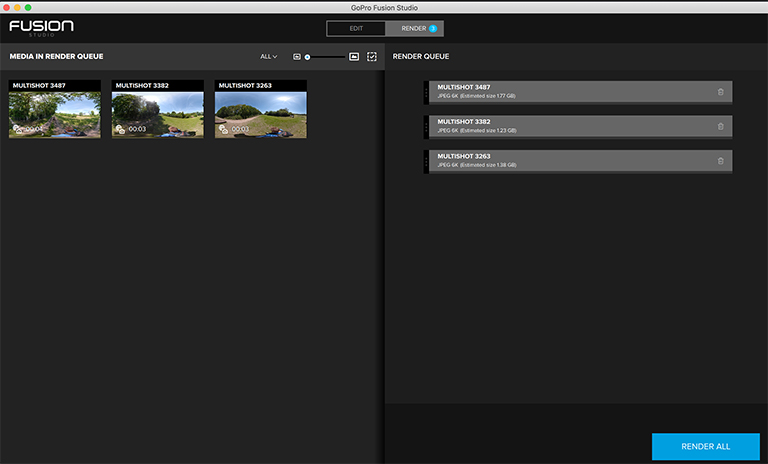
Once you’re happy, select all the tours you want to render and add them to the render queue.
3.2.1 Colour / other settings
Don’t mess around with the colour settings too much, if at all. If you plan to upload to Google Street View, images where colouration has been significantly modified (think Instagram filters) will be rejected by Google.
3.3 Rendering Settings
Before stitching, you can also edit how GoPro Fusion Studio will output the photos.

For each tour in the queue, make sure to select the highest resolution possible if you plan to upload to Street View (they must be at least 4K). You can do this by clicking on each tour in the render queue.
If you shot in time-lapse mode, make sure set the video codec to JPEG OR TIFF. This will produce individual photos.
Before rendering, check the output location on your machine for stitched photos is correct. You can view or modify this location under “Preferences”.
3.3.1 Video codecs
You can stitch time-lapse photos to video files using GoPro Fusion Studio, however, I have found these are incompatible with Google Street View with Google rejecting the video file. You must therefore record in video mode on the GoPro Fusion to produce a Street View compatible movie output using GoPro Fusion Studio. As mentioned earlier, we won’t cover video in this doc for reasons described.
3.3.2 Render performance
Rendering in GoPro Fusion Studio is memory intensive. I use a MacBook Pro with a good CPU (i7 processor) and 16GB of RAM. Whilst fairly powerful, the rendering process will make my computer unusable until the process completes. As a rough estimate, on my computer it takes 10 minutes for every 1GB of photo output.
End
This completes the guide to the Trek Pack v1.
</div>