Trek Pack v2 Processing
How to process your MAX content...
Processing
Backup files from the SD Card
Make sure to keep make a copy of the videos / images on the microSD card before you start processing/modifying them. You might need them again later.
Timelapse Mode
Processing Your Photos
After shooting, copy the files for each segment of the tour onto your computer using the MicroSD USB card reader.
Have a look at the photos captured.
In my case, often the first and last 20 photos will be me setting up the camera or stopping. Occasionally I am also disturbed mid-tour (usually by animals).
The photos are stitched on the camera, so you only have to remove any unwanted photos before publishing elsewhere.
1.0.1 A note on filename format
The photo filename is split into 3 identifying parts (I'll use GSAC0857.jpg as an example):
GS: always the same. Can be used to identify a photo taken on the MAX.AC: each time you start and stop the timelapse the latter will increase by one (AA,AB,AC,AD...)- 0857: increases by one with each photo in the timelapse
This can be useful information to know when organising tours. For example, you might shoot sequences over multiple shoots. In such cases, knowing the filename behaviour might help you organise them.
Video Mode
Processing Your Videos
1. Download GoPro Player
To process videos, you’ll need to download a piece of software called GoPro Player.
At the time of writing, only the GoPro Player for Mac will allow you to create .mp4 videos with GPS telemetry. If you use a Windows machine, we recommend shooting in timelapse mode.
2. Import and prepare your raw videos
After shooting, copy the video files onto your computer using the MicroSD USB card reader.
You'll see 3 types of files:
.360: a GoPro proprietary video format. This holds the raw video and telemetry. It can only be read by GoPro software, and needs to be processed into another video format for use elsewhere (see following steps). This is the file you'll need for processing..LRV: stands for Low-Resolution Video. These are what you’re actually seeing through the GoPro app when you play back the video..THM: stands for Thumbnail. It’s a small image file that’s 160 by 120 pixels. It’s what you see in the GoPro app as the thumbnails to visually represent each video file.
2.0.1 A note on filename format
The video filename is split into 3 identifying parts (I'll use GS010135.360 as an example):
GS: always the same. Can be used to identify a video taken on the MAX.01: (first 2 digits) the camera breaks videos longer than 8 min 2 seconds into separate files. Increases by one with each 8 min 2 seconds recorded. For example, a 19 minute video would be split into 3 files (GS010135.360,GS020135.360,GS030135.360).0135increases by one with each new video shot.
3. Add raw files to GoPro Player
Now you have a folder of front and back images on your computer, you can add them to GoPro Player.
Select: File > Batch Exporter
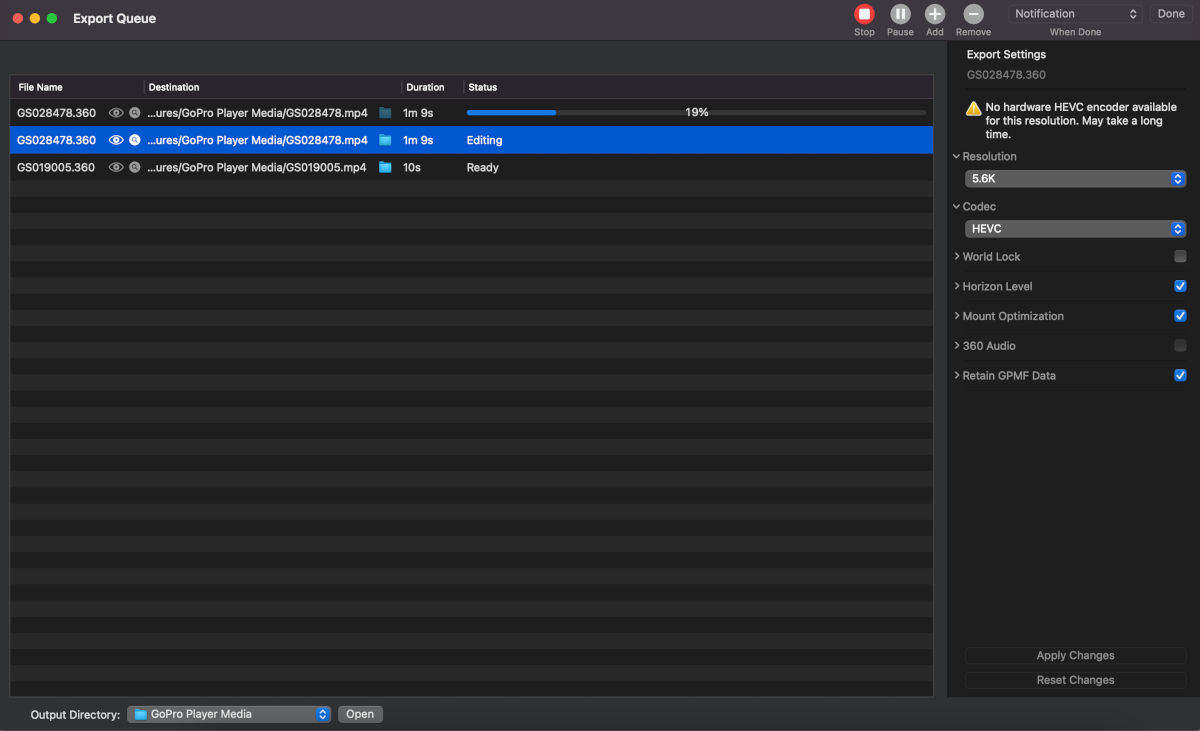
4. Define export settings
Click one of the videos you have added to the batch exporter.
If you've added more than one file to the queue, hold down shift and select all files in the list. Click edit (top right of app).

Select:
- Resolution = 5.6k
- Codec = HEVC
- World lock = FALSE
- Horizon level = TRUE
- Mount optimization = TRUE
- 360 Audio = FALSE
- Retain GPMF data = TRUE
Now all the videos in the queue will have the correct export settings.
You can now press the play button to start the export.
When complete, you'll have an .mp4 file in the output directory specified (shown and configurable in bottom menu of app).
End
This completes the guide to the Trek Pack v2.
