How we optimised the process of turning a video into frames using speed of travel as a variable.
With the Trek Pack v1 we shot in timelapse mode, where the interval setting was determined by the speed of transport used during shooting. This was a compromise as the Fusion’s video mode was very battery intensive.
The MAX used on our v2 pack improved upon battery performance in video mode and we stated shooting in video mode only. The MAX also only supports a frame rate of 0.5 FPS (1 photo every 2 seconds), which is not paticularly fast for moderate-speed travel (e.g. biking).
One of the biggest benefits of videos is that they can be recorded at a much higher frame rate. In video mode you can record up to 120 FPS @ 3k and 30 FPS @ 5.2k on the MAX. Ultimately, this means there is more footage for us to work with (and discard as needed), not afforded when using timelapse mode.
Though extra frames come at a cost, and I had to apply some trade-offs for my own use-cases…
Why not extract all frames of the video?
In a perfect world, you would extract all video frames. For example, if a video was shot at 30 FPS, you would extract all 30 frames.
For a video of 10 minutes, that is 18000 frames ((30x60)x10).
Assuming each frame is about 10Mb (about right for a 360 photo), that is 180Gb of images. This number is inflated, but you lose the advantage of the compression provided by video codecs.
At scale, this quickly adds up to very big numbers in terms of storage space and processing power required.
How to determine the best extraction rate
For virtual tours, the main measure of extraction comes down to the distance you want between photos.
As noted in this post on the Google support forum, Google Street View paths (photos connected with a blue line) should not be greater than 5 metres apart.
For the optimum viewing experience of virtual tours, we have found photos about a metre apart work best. They are close enough that scenery does not get passed too quickly, nor are they to close together that navigation becomes tedious.
To hightlight the difference between video mode and timelapse mode; rraveling at an average speed of 10 km/h (2.75 m/s) in 2 second timelapse mode will produce one photo about every 6 metres. Shot in video mode at 24 FPS results in one photo every 0.1 metres.
In order to calculate the extraction rate to achieve a spacing of 1 meter you first need to know the speed at which the tour was captured.
Choosing video extraction framerate for virtual tours
There are a few ways to obtain a speed value to determine the frame rate needed;
- estimate average speed using the transport method used (considers average speed only)
- find start and end time, and start and end position of the video and work out the average speed (considers average speed only)
- use video telemetry to work out speed changes over the video and adjust frame rate dynamically (considers changes in speed)
Option 1: estimate average speed using the transport method used
The table above gives some rough averages for various methods of human powered;
| Sport | Ave speed km/h | Ave speed m/s (kmh/3.6) | Frame spacing @ 24 FPS (ave speed m/s / 24) | Min recording FPS needed (at frame every 0.5 meter) | Min recording FPS needed (at frame every 1 meter) | Min recording FPS needed (at frame every 5 meter) |
|---|---|---|---|---|---|---|
| Freefall | 200 | 55.56 | 2.31 | 112 | 56 | 12 |
| Downhill sports (skiing, MTB, etc) | 30 | 8.33 | 0.35 | 17 | 9 | 2 |
| Bi-cyling (flat), kayaking (downstream) | 20 | 5.56 | 0.23 | 12 | 6 | 2 |
| Hiking (uphill), walking | 3.6 | 1.00 | 0.04 | 2 | 1 | 1 |
| Hiking (downhill) | 1.6 | 0.44 | 0.02 | 1 | 1 | 1 |
| 1 meter per frame | 86 | 23.89 | 1.00 | 48 | 24 | 5 |
Grab the formulas used in this table here.
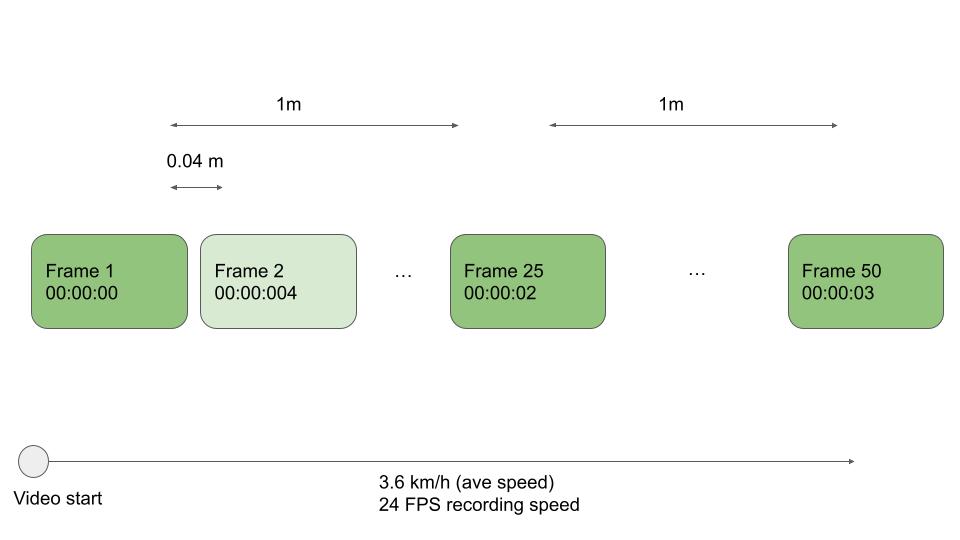
Most methods of transport our trekkers use are slow enough where frames are spaced much closer than 1 metre. For example, traveling at 3.6 km/h (1 m/s) with a video frame rate of 24FPS, each frame is spaced 0.04 metres apart.

You only run into an issue where frames are spaced further apart than the recording frame rate. At this point you can only extract all frames from the video and will have to accept the spacing provided (see: freefall example).
That said, for our trekkers this is unlikely to occur. At 86 km/h you would need to be shooting at 48 FPS on the camera to ensure you could extract one frame per seconds. Thus, shooting at 24 FPS (offered on all GoPro cameras) you could be travelling at 43 km/h before spacing between each frame exceed 1 metre.
Now, assuming the distance between frames in the video is actually much less than 1 metre (e.g. when walking), the extraction rate used will be the average speed in metres per second rounded up to the next integer (e.g. 8.33 m/s = extraction rate of 9 FPS for spacing of 1 metre).
For a larger spacing (or shorter spacing), you can use the following calculation (also shown with formula here)
ffmpeg -r value (fps) = ave speed (m/s) / frame spacing (metres)
e.g. for spacing every 5 metres at average speed of 8.33 m/s
ffmpeg -r value (fps) = 8.3 / 5
ffmpeg -r value (fps) = 2
You can already see the frame savings over the raw video. If original framerate is 24 FPS, 2 FPS is a 12x reduction in the amount of frames.
Using ffmpeg you can now extract the frames like so;
$ ffmpeg -i VIDEO.mp4 -r 2 -q:v 2 FRAMES/img%d.jpg
- -r: Set frame rate (Hz value, fraction or abbreviation).
- -q:v: Controls the quality of output
Benefits:
- Fairly accurate for virtual tours where a consistent speed is usually observed.
Negatives:
- Does not account for changes in speed well (results in photos bunched when slowing down and spread out when speeding up)
Option 2: find start and end time, and start and end position of the video and work out the average speed
The GPS telemetry in the video provides us with the start time (first GPSDateTime value in the telemetry). You can calculate the end time using this and the Duration metadata value (first GPSDateTime value + Duration value).
The telemetry also provides the start position and end position of the video (first and last GPSLatitude, GPSLatitude, and GPSAltitude respectively).
To work out average speed you need to know the distance between the two points.
To calculate distance, you can use the Haversine formula to find the distance between two points on a sphere (Earth) given their longitudes and latitudes.
Once you have calculate the distance, to work out speed;
speed (m/s) = distance between points (metres) / duration (secs)
All that is left to do is adjust speed for frame rate.
We know the framerate (it is reported in the telemetry), e.g.
<Track1:VideoFrameRate>29.971</Track1:VideoFrameRate>
As an example, let’s say distance was 100 metres from start to end of video, the video was 20 second long, and you want 1 frame every metre. Here is the resulting calculations;
speed m/s = distance between points (metres) / duration (secs)
speed m/s = 100/20
speed m/s = 5
extraction rate fps = speed (m/s) / desired spacing of frames (metres)
extraction rate fps = 5/1
extraction rate fps = 5
Using this value, you can use ffmpeg like before, adjusting the -r value;
$ ffmpeg -i VIDEO.mp4 -r 5 -q:v 2 FRAMES/img%d.jpg
Benefits:
- More accurate than option 1 as it accounts for differing people (e.g. some walk faster than others).
Negatives:
- Like option 1, does not account for changes in speed well.
Option 3: use video telemetry to work out speed changes over the video
Here you first work out speed at each stage of the video using the telemetry track.
Note, you will get no more than 18 values for speed each second using a GoPro Camera (18 Hz the max resolution of the GPS chip). This is less than the frame rate.
Using the distance travelled and time between each second in the video allows you to calculate an average speed per second (e.g. 0-1 = 10m/s, 1-2 = 12m/s, 2-3....).
Note: You could calculate ave speed to 0.1 second resolution, (the ffmpeg -r flag accepts to 0.1 seconds) but it is overkill for our purposes.
As done previously, you can calculate extraction rate FPS (speed (m/s) / desired spacing of frames (metres)).
You now have FPS extraction values for each second of the video (vs whole video as you used in options 1 and 2). As a result, you now need to modify the ffmpeg command.
Unfortunately, the ffmpeg -r flag does not account for extraction at variable frame rates in a single video. This is because 99.9% of videos have a fixed frame rate.
In this case you can use the -ss (start) and -to ffmpeg seeking function for each 1 second segment of video of the video (replacing the -r value with the calculated FPS value calculated earlier for each 1 second increment). e.g.
$ ffmpeg -i VIDEO.mp4 -ss 00:00:00 -to 00:01:00 -r 10 -q:v 2 FRAMES/img%d.jpg
$ ffmpeg -i VIDEO.mp4 -ss 00:01:00 -to 00:02:00 -r 3 -q:v 2 FRAMES/img%d.jpg
$ ffmpeg -i VIDEO.mp4 -ss 00:02:00 -to 00:03:00 -r 8 -q:v 2 FRAMES/img%d.jpg
...
Benefits:
- Most accurate method to get real spacing between frames as it accounts for changes in speed during the recording
Negatives:
- It is a little more complex to write the commands programmatically, and introduces a little more processing overhead (but not too much)
Optional: use GoPro reported speeds
In option 2 and 3 I calculated speed manually using distance and time values.
GoPro videos offer some help with calculating speed – the speed of travel is actually reported in the GPMF metadata.
Here is the metadata of a sample video shot on the MAX.
You will see two types of GPSSpeed values are regularly reported alongside position, GPSSpeed and GPSSpeed3D.
<Track3:GPSLatitude>51 deg 16' 21.22" N</Track3:GPSLatitude>
<Track3:GPSLongitude>0 deg 50' 45.55" W</Track3:GPSLongitude>
<Track3:GPSAltitude>81.072 m</Track3:GPSAltitude>
<Track3:GPSSpeed>0.488</Track3:GPSSpeed>
<Track3:GPSSpeed3D>0.51</Track3:GPSSpeed3D>
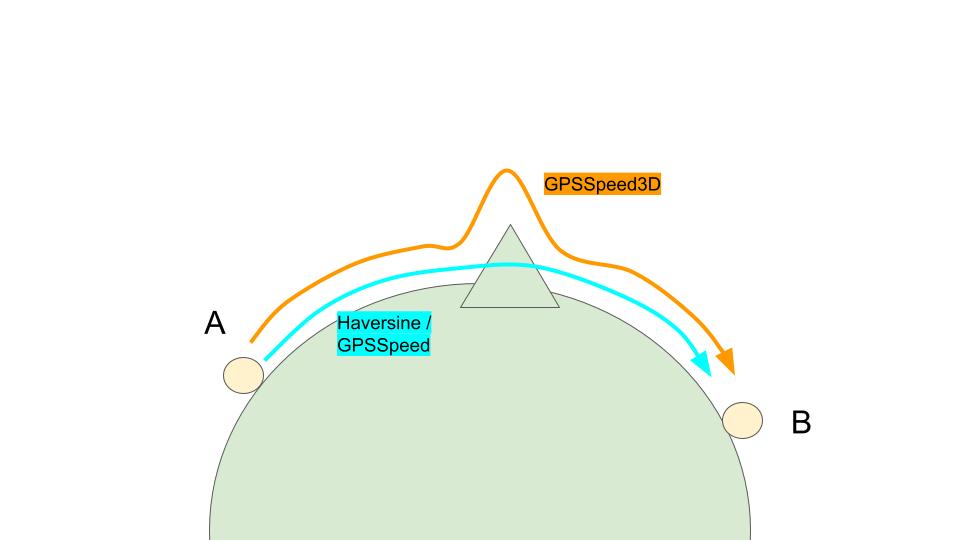
GPSSpeed is the horizontal speed (2 Dimensional – latitude and longitude) aka ground speed (it is the same as the Haversine formula you used earlier).
GPSSpeed3D accounts for horizontal and vertical changes (3 Dimensional – latitude and longitude and altitude), it is aware of the mountains and valleys you might have traversed (from altitude values reported).

Using the time reported in GoPro telemetry will not offer much accuracy over calculating manually (you are doing the same calculations), but it will save you the time and processing power to do those calculations (although you will have to write to code to correctly ready speed values). As such, I prefer to do the manual calculations in my code.
One final consideration
As technology develops, having more data (photo frames) available is advantageous.
For example, when mapping objects in real space using Photogrammetry.
The resulting 3D models are more accurate when there are more data points (frames) at slightly different angles because the code has more knowledge to work with.
Again the trade-off comes down to power and storage. At small scale, extracting higher frames is fine, but when you are processing 100’s of videos a day, costs will quickly add up.
We're building a Street View alternative for explorers
If you'd like to be the first to receive monthly updates about the project, subscribe to our newsletter...


