The image quality of video frames can vary significantly between two cameras offering the same resolution, but why?
“But this video is only 4K (8.5 megapixels).”
Said me when looking at the metadata of a video created using a GoPro Fusion.
So what is going on here?
A large part of the answer comes down to what happens to the image data after it hits the sensor, bit rate being a critical factor.
Bit rate 101
All technology is limited by the amount of data it can transfer at any one point in time.
Bit rate is the number of bits that are conveyed or processed per unit of time.
You are probably familiar with paying for your internet connection in packages based on Mbps (Mega BITS per second, not to be confused with megaBYTES), Or Gbps (Gigabits per second) if you’re really lucky!
1 megaBIT = 0.125 megaBYTES.
In the world of photography, bit rate refers to the amount of data a camera captures/records per second.
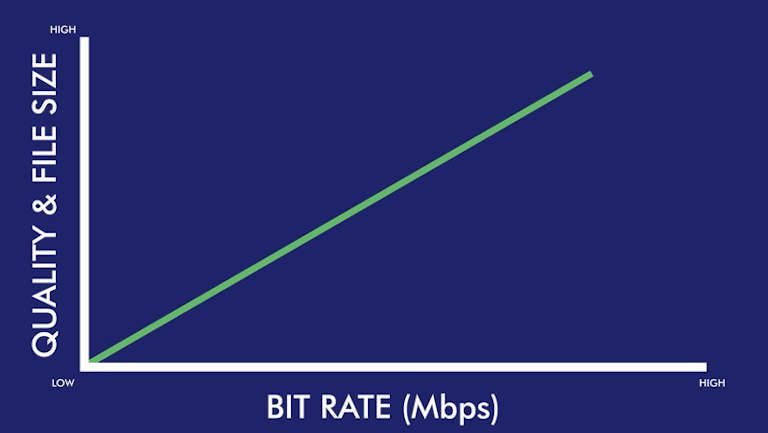
In short, a higher bit rate equates to a higher quality output because it allows the camera to record more details (data) about each frame.
Many people confuse bit rate (the amount of data captured) and resolution (the size of a photo/video). They are independent of one another. Resolution is the pixel size of your video. It does not necessarily determine the quality of your video.
Sure, when you have a higher resolution like 4K, you generally have a better looking video. But that is because cameras will generally record at a higher bit rate for these larger resolution files.
If you kept the bit rate constant and shot two videos – one at 1080p and one at 4K – you would notice that the 1080p video might actually look better. The 4K video must spread all of this data over a larger pixel area, thus compromising the look.
Bit rate and video files
Cameras process tons of data about every single second of a video. After all, each second contains multiple frames composed of millions of bits of information.
And the bit rate of the main video stream isn’t the whole story when it comes to what’s being written to the SD cards.
The main MP4 video stream of the GoPro Fusion also includes a 128Kbps stereo AAC audio stream. Recorded at the same time (only to the card in slot 1) is a 1 Mpbs, 32-bit, 4-channel PCM WAV audio stream. There’s also the preview version of the video, the LRV file, that records at about 2.8 Mpbs.
When shooting a video, each frame (or period of time for sound and telemetry) captured by the sensor holds a differing amount of information.
Noise increases file sizes. A busy image with lots of trees and people will be larger then a photo of a clear blue sky.
Settings for the capture (ISO, white balance, etc.) will also affect the resulting data size of each frame.
More sound, more data. More telemetry, more data.
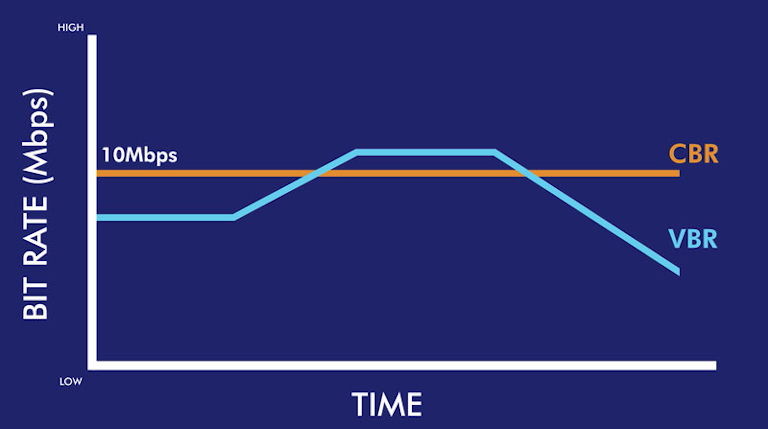
This is why bit rate varies throughout the video (and why the video metadata of a video almost always reports an Avg Bitrate).
You might hear terms like constant bit rate too. This is where the camera makes sure every frame contains the same amount of date, and is usually done with compression algorithms.
Image compression
One easiest ways to reduce bit rate limitation imposed by the camera is to shrink the image resolution (size) – smaller images produce smaller amounts of data.
It is for this reason many cameras on the market have lower resolution for videos when compared to still photos.
Video compression algorithms (codecs) also work to take an input and produce an output of lower file size, whilst minimising any reduction in image quality.
Common video codecs include:
- H.264
- MPEG-4
- DivX
- MPEG-2
- HEVC (H.265)
Note: the video player must understand the codec in order to play the file. Most major players understand the above formats, but more obscure formats might lead to incompatibility problems.
Each compression algorithm works in a different way, and thus all produce differing outputs. Even images shot with exactly the same settings can look different if encoded (compressed) using different codecs Read this article for a good overview of how video compression works.
By applying these algorithms before the data is transmitted, you can reduce the file size down the line (e.g. before it hits the on-camera stitching process).
GoPro Example
A single sensor on the GoPro Fusion shooting at the highest quality in photo mode (18 megapixels) gives a final image of about 2.5 Megabytes or 20 Megabits. If I take one photo every second it would require a bit rate of 20 Megabits per second per sensor.
Shooting single photos won’t trouble the Fusion’s maximum bit rate. But video is a different story.
The GoPro Fusion camera can shoot 360 video in 5.2k (no Protune) at maximum bit rate of 60 Mbps per sensor. Put another way, the sensors and other components in the camera cannot handle data transfer rates greater than 60 Mbps.
| MODE / FPS | Bit rate (no Protune) | Bit rate (Protune) |
|---|---|---|
| 5.2K30 | 45 | 60 |
| 3K60 | 45 | 60 |
You can see the problem. If each photo at 18 megapixels is 20 Megabits we can only write 3 per second (20Mbps * 3 images per second = 60Mbps).
As the frame rate increases on the GoPro Fusion (the amount of data captured), the video resolution (image size) decreases (5.2K30 vs. 3K60).
One consideration that isn’t immediately apparent from the GoPro camera menu options is that enabling Protune for video switches the camera to allow for a higher bit rate recording (60Mbps vs 45Mpbs).
With Protune the image settings are predefined (constant ISO, white balance, etc.), making the outputted image size easier to control (and less likely to exceed the maximum bit rate).
This is not the case when shooting RAW photos where these settings can vary frame to frame, and consequently frame size can too (making it much more likely to exceed maximum bit rate) and consequently more aggressive compression is applied.
The extra room means it is possible to exceed the advertised maximum bit rate safely, without troubling the absolute maximum bit rate of the camera, resulting in lost information (frames, sound, telemetry, etc.). It allows for an additional buffer when larger frames are being shot.
During stitching and encoding on your PC, GoPro Fusion Studio allows you to choose a number of final codecs.
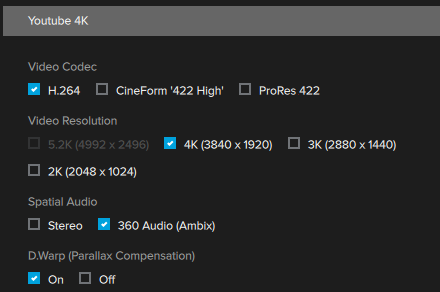
- Cineform ‘422 High’: which is compatible with Windows (
.avior.mov) and Mac OSX (.mov). Maximum 5.2K resolution. - ProRes 422: is a standard codec supported by Apple (
.mov). Maximum 5.2K resolution. - H.264: The most widely understood video compression standard of the three listed here for high-definition digital videos (
.mp4). Maximum 4K resolution.
Cineform ‘422 High’ and ProRes 422, keep the highest quality possible thanks to their compression algorithms (but the resulting file size will be much larger).
Even if your video is shot in 5.2K if you choose .mp4 using the H.264 codec, the maximum output will be 4K (due to codec limitations).
Avoiding loss in video image quality
When shooting
First of all, make sure any storage devices aren’t causing a data bottleneck. It’s especially important that you have a SD card or external hard drive that’s fast enough to write the data generated by the camera (offering speeds higher than the maximum bit rate).
For example, the SanDisk Extreme microSDXC UHS-I Memory Cards used in the GoPro Fusion cameras on our Trek Packs write data up to 90Mbps.
You could also reduce the frames per second recorded by the camera, if this feature is offered.
At a high-level; more FPS = a smoother visual experience.
Film and TV is shown at 24 FPS. Super slow motion videos (like those from the Slow Mo Guys), are shot using cameras with a very high frame rate (this might seem counterintuitive at first).
But for 360 mapping, such high frame rates are excessive.
For Street View tours Google recommends:
If supported by your camera, consider setting the frame rate to 5 frames per second at driving or biking speeds and 1 frame per second for walking speeds.
Unfortunately the GoPro Fusion offers two fixed frame rate settings for videos, 30 or 60 FPS.
Finally, you could reduce the compression on the camera, using settings like Protune on the Fusion. But be careful, photos and videos are subject to various stylistic criteria, including:
Stylistic adjustments (such as applied filters) are acceptable, provided that these stylistic changes are minimal and are not appended elements such as borders, text, collaged images, etc.
With Protune, you can apply manual settings which can start to stylise the image. Small modifications won’t have an impact, if you start getting creative with ISO speeds, etc. you might run the risk of rejection.
When processing
Beware of stitching software and video codecs that might further reduce the image quality.
When uploading
Beware of video hosting sites that apply their own additional compression.
Ever noticed how YouTube uploads look worse than the originals on your computer? YouTube, like many other streaming sites use specialised algorithms to compress videos to further reduce their file size (on top of any compressions you’ve already applied during encoding).
While the compression algorithms YouTube use are very good, they’re certainly not perfect. There is a trade off between image quality and file size to ensure the videos load as quickly as possible for viewers.
Why we prefer timelapse for outdoor tour capture
Alternatively, you can use timelapse imagery.
You’ll get higher image quality, and it will be easier to process them. The downside is that you won’t have as much flexibility in the number of photos to choose from before upload.
We currently recommend timelapse mode on the Trek Pack (GoPro Fusion) for tour capture.
We're building a Street View alternative for explorers
If you'd like to be the first to receive monthly updates about the project, subscribe to our newsletter...
