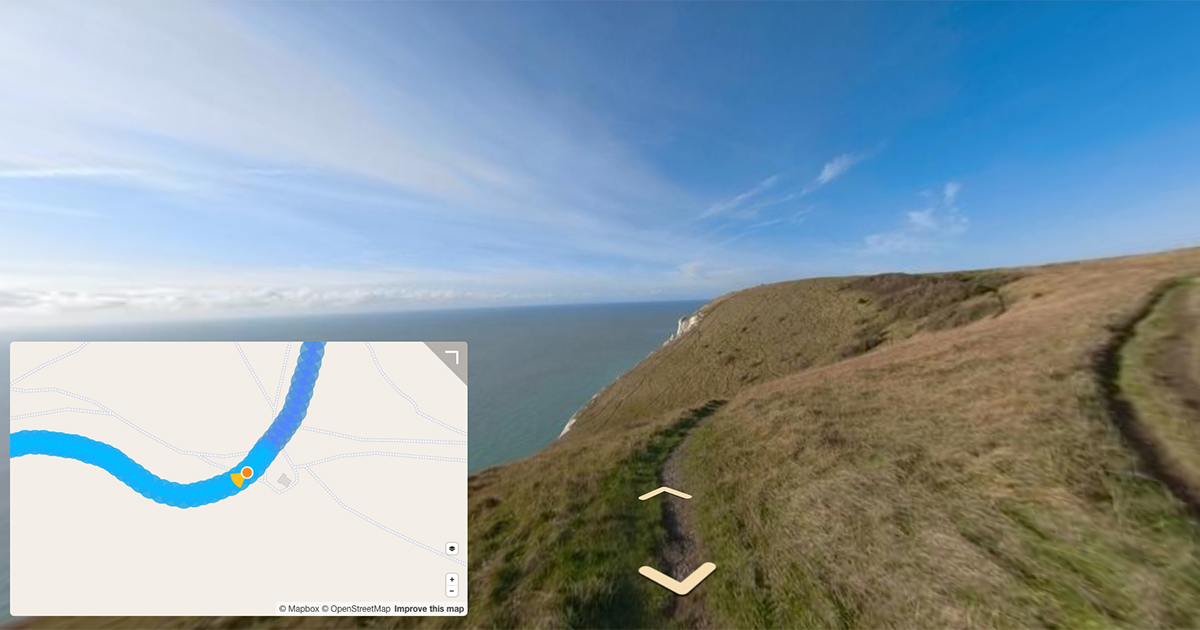
Put a map inside your GoPro video showing exactly where is was shot.
A few weeks back I showed how to use gopro-telemetry to extract gpmf metadata from GoPro videos.
Given the types of videos created when making virtual tours, one of the uses for the resulting .json telemetry file is mapping.
I was recently thinking it would be cool to add a live map into a video to show the exact position it was shot.
It is possible as both the video stream and telemetry stream from gopro-telemetry (.json file) both contain time information that can be used to overlay the correct telemetry position at the right video time.
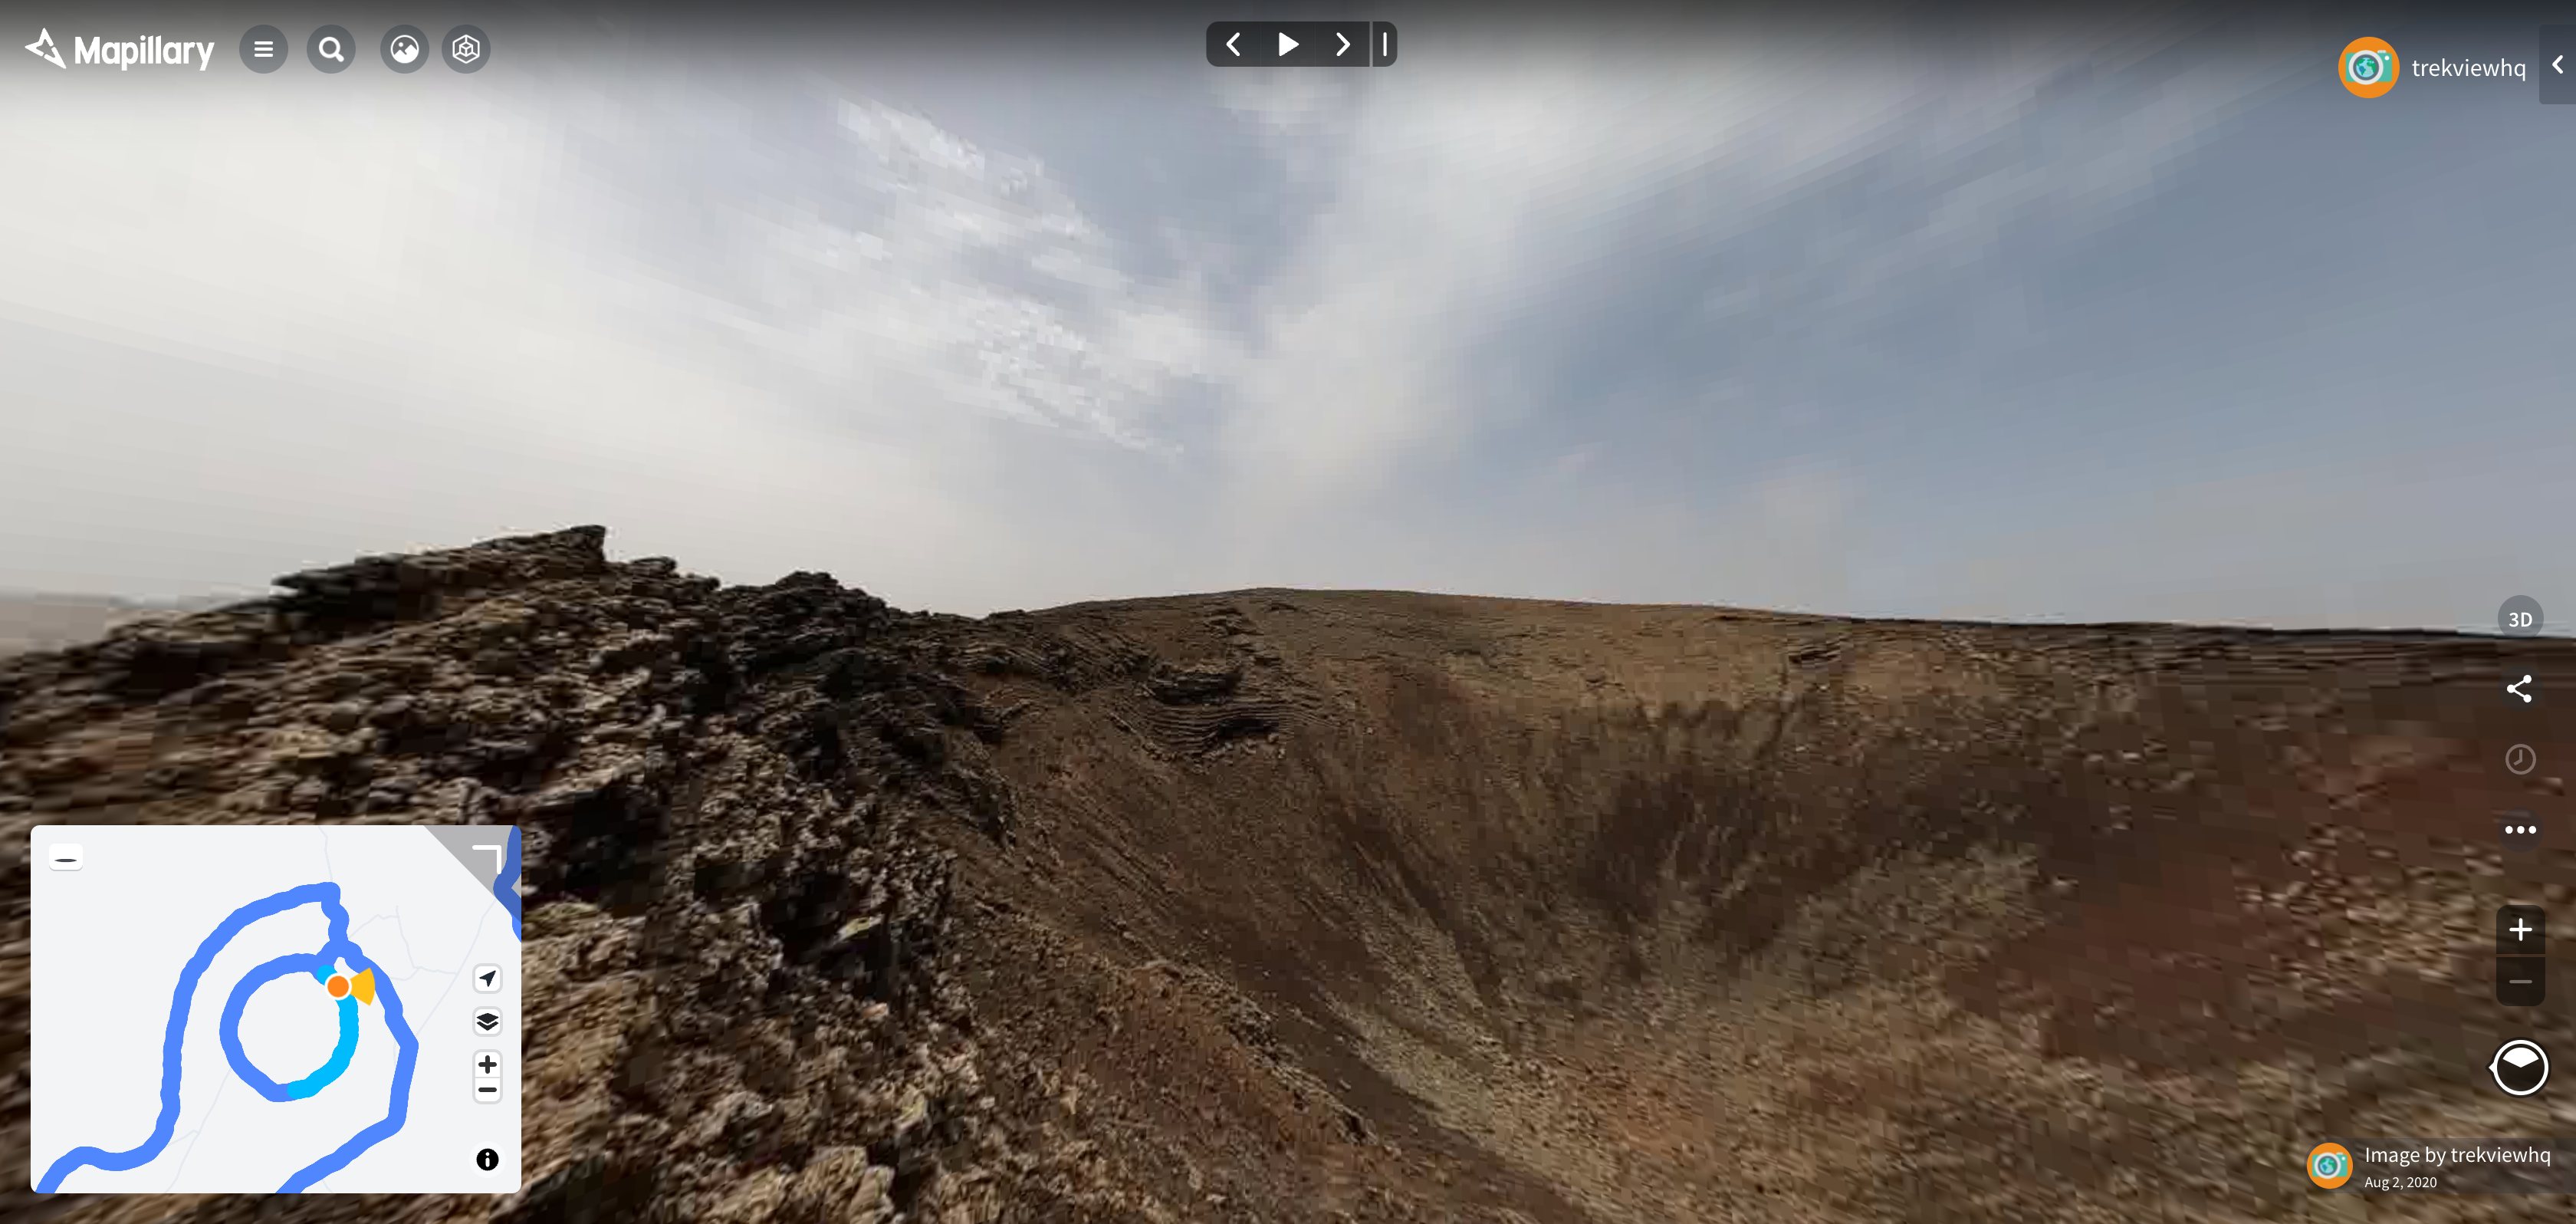
I set out to create a video with a Mapillary style map overlay showing both the current position of the video and the entire route covered.
Here is how I used gopro-telemetry, MapBox, ffmpeg, and a few other tools to bring this idea to life…
Sample JSON telemetry
For this example I will use two videos:
GX010044.MP4: a HERO video shot on the GoPro HERO 10 with a resolution of 5312x2988 (5.3k).GS020176.mp4: an equirectangular video shot on the GoPro MAX and stitched with GoPro Studio with a resolution 5376x2688 (5.6k).
I have extracted the GPS5 telemetry stream using gopro-telemetry for both these videos.
Below is the first GPS point from GX010044.MP4:
{"1":
    {"streams":
        {"GPS5":
            {"samples":[
                {"value":[53.3758026,-1.5853544,183.947,0.849,0.62],"cts":39.389,"date":"2022-01-12T15:40:00.765Z","sticky":
                    {"fix":3,"precision":537,"altitude system":"MSLV"}
                },
And for GS020176.mp4:
{"1":
    {"streams":
        {"GPS5":
            {"samples":[
                {"value":[45.5110536,6.6640868,2126.034,2.627,2.68],"cts":0,"date":"2022-03-06T09:43:35.364Z","sticky":
                    {"fix":3,"precision":129,"altitude system":"MSLV"}
                },
In the gopro-telemetry .json there are two time values;
cts: this is the milliseconds since the first frame of the videodate: this is the datetime reported by the GPS sensor
GX010044.MP4 GPS telemetry runs from 2022-01-12T15:40:00.765Z to 2022-01-12T15:40:14.013Z with 217 positions.
GS020176.mp4 GPS telemetry runs from 2022-03-06T09:43:35.364Z to 2022-03-06T09:43:49.994Z with 257 positions.
1. The plan
The telemetry contains GPS information (timestamp, latitude, longitude). For each time,lat,lon point I will generate a static image showing that point on a map.
The map images can then be wrapped into a video that can be overlaid onto the original video, creating the effect of a real-time map-in-video showing the current position in the world that the video was filmed.
2. Generating a GeoJSON for the overlays using gopro-telemetry
The MapBox Static Images API has a free tier which allows for 50,000 request per month at no cost. Ignoring some trial and error, I only need about 500 calls for each of the videos above.
Given our videos are outdoors and adventure based, I will use the MapBox Outdoor map style, retrieved using the endpoint https://api.mapbox.com/styles/v1/mapbox/outdoors-v11/static/.
I will overlay onto the map a:
LineString: showing the entire routePoint: showing the current video position
It’s therefore easier to first create a GeoJSON file to pass to the MapBox Static Images API.
The first GeoJSON (000000.geojson – named in sequential order of points, starting with 0) will look like this for GX010044.MP4 (note, I have only inserted the first 3 GPS points for this example):
{
    "type": "FeatureCollection",
    "name": "Sample",
    "features":
    [
        {
            "type": "Feature",
            "geometry":
            {
                "type": "Point",
                "coordinates":
                [
                    -1.5853544,
                    53.3758026
                ]
            }
        },
        {
            "type": "Feature",
            "geometry":
            {
                "type": "LineString",
                "coordinates":
                [
                    [
                        -1.5853544,
                        53.3758026
                    ],
                    [
                        -1.585357,
                        53.3758009
                    ],
                    [
                        -1.585358,
                        53.3758015
                    ]
                ]
            }
        }
    ]
}
In the second GeoJSON (000001.geojson), the LineString object will remain the same, however the Point will be updated to the second point in the telemetry,
        {
            "type": "Feature",
            "geometry":
            {
                "type": "Point",
                "coordinates":
                [
                    -1.585357,
                    53.3758009
                ]
            }
        },
…and so on for all of the remaining GeoJSON files. Note, the geojson is in lon,lat format.
3. Calculate images size and overlay position
My inspiration for the overlay comes from Mapillary, a-picture-in-picture map in the bottom left corner of the video, so I need to resize the map images accordingly.
Note, MapBox will only generate images with a length or width less than or equal to 1280.
3A. HERO videos
For HERO video, I have found the following dimensions look best;
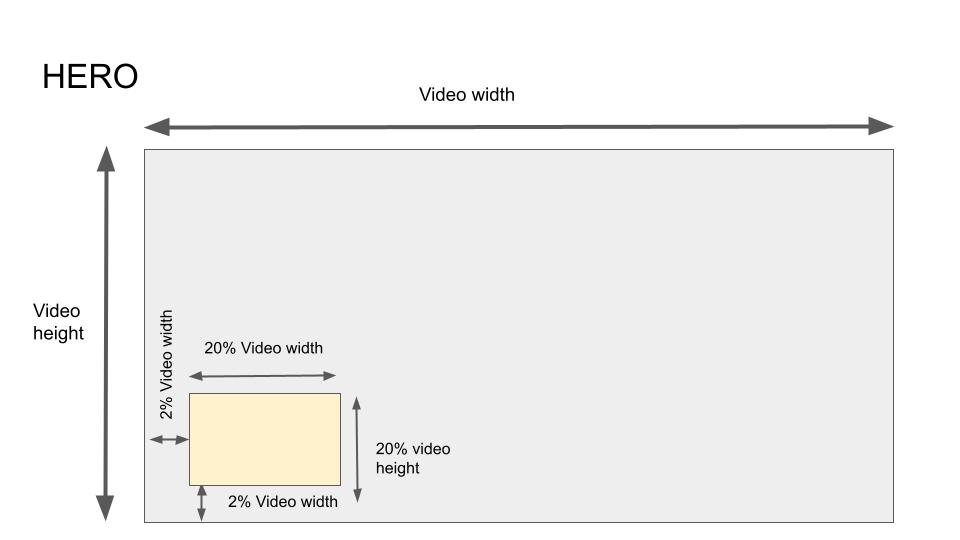
I generate an map image with the same proportions as the video by calculating 20% of video width and height (rounded to the closest integer) and assigning to map width and height. For the margins, I calculate 2% of video width.
So for the example GX010044.MP4 (5312x2988) gives;
- width = 20% video width =
5312*0.2= 1062.4 = 1062 - height = 20% video height =
2988*0.2= 597.6 = 598 - left / bottom margin = 2% video width =
5312*0.02= 106.24 = 106
3B. 360 (equirectangular) videos
You can identify equirectangular videos using the metdata tag <XMP-GSpherical:ProjectionType>equirectangular</XMP-GSpherical:ProjectionType> (using exiftool).
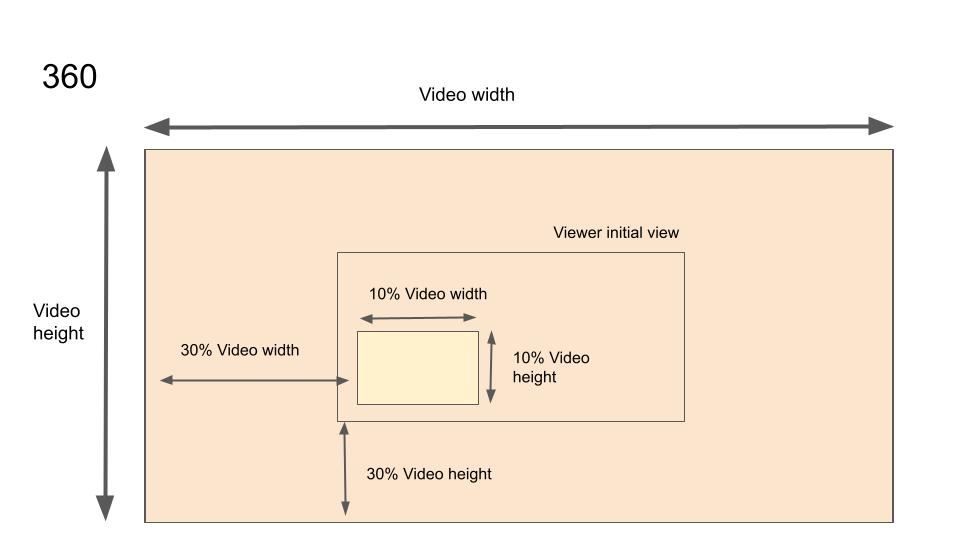
Now, you could convert the map to an equirectangular projection too. However, as I noted in that post:
If you’ve every looked at a equirectangular projected 360 photo you will have clearly seen how distorted it is at the top and bottom of the image, but less around the center.
The center, where I plan to overlay the map, as shown, suffers the least distortion from a normal projection, meaning you can get away with not converting it (as long as it doesn’t stray too near the top and bottom of the video – you’ll need to experiment).
If you did need to convert the map to an equirectangular projection you would first need to create it using the API and then:
- create a png file matching the original video resolution (with a transparent background). This is required so that the map images are mapped to the correct equirectangular space.
- place the map image into it in the desired space (where you want it to appear in the viewer)
- convert the whole image to equirectangular ready to be overlaid onto the video
I won’t convert my map to equirectangular in this post (judge the output for yourself), and will simply resize in the same way I showed for non-equirectangular videos.
My calculations for map image dimensions are a little different here because I want my map to be immediately visible in the 360 viewer when the video plays, and the way equirectangular videos appear in the viewer is different.
As the viewer does not contain the entire video in frame, I reduce the width and height of the map to just 10% of video width and height respectively. The margins are also much larger, to ensure the map shows in the initial view (before the user starts to look around).
So for the example GS020176.mp4 (5376x2688) I use:
- width = 10% video width =
5376*0.1= 537.6 = 438 - height = 10% video height =
2688*0.1= 268.8 = 269 - left / bottom margin = 30% video width =
5376*0.3= 1612.8 = 1613
4. Generating the map images using MapBox
You can pass then pass the newly created GeoJSON files to MapBox’s GeoJSON endpoint.
MapBox accepts the GeoJSON object encoded as a URI component passed in the URL.
Therefore the only thing that is left to do is minify and then encode each GeoJSON file so it can be passed like so;
$ curl -g "https://api.mapbox.com/styles/v1/mapbox/outdoors-v11/static/geojson({GEOJSON})/{LON},{LAT},{ZOOM}/{WIDTH}x{HEIGHT}?access_token={APIKEY}" --output {FILENAME}.png
These are the required parameters, but there are more documented here should you want to play around.
{LON},{LAT} are the map center (MapBox also expects lon,lat format), {ZOOM} is the MapBox zoom level, and {WIDTH}x{HEIGHT} were calculated at step 3.
Using the GeoJSON code snippet shared above (minified), the full command would be;
$ curl -g "https://api.mapbox.com/styles/v1/mapbox/outdoors-v11/static/geojson(%7B%22type%22%3A%22FeatureCollection%22%2C%22name%22%3A%22Sample%22%2C%22features%22%3A%5B%7B%22type%22%3A%22Feature%22%2C%22geometry%22%3A%7B%22type%22%3A%22Point%22%2C%22coordinates%22%3A%5B-1.5853544%2C53.3758026%5D%7D%7D%2C%7B%22type%22%3A%22Feature%22%2C%22geometry%22%3A%7B%22type%22%3A%22LineString%22%2C%22coordinates%22%3A%5B%5B-1.5853544%2C53.3758026%5D%2C%5B-1.585357%2C53.3758009%5D%2C%5B-1.585358%2C53.3758015%5D%5D%7D%7D%5D%7D)/-1.5853544,53.3758026,10/500x300?access_token=hidden" --output 0.png
You might run into issues here depending on how many points are in your telemetry file. MapBox has a 8192 character limit on URL lengths. .geojson files for videos longer than a few seconds can start to break this threshold.
There are three options in this case;
- filter the number of points generated in the telemetry by using the options in GoPro telemetry (read more here)
- uploading a new style using the
.geojsonfile in the MapBox Studio UI - creating a new style using the
.geojsonfile via the MapBox API (recommended)
5. Create a video file of the images using ffmpeg
Now that we have the map images we can overlay them onto the video.
The tricky bit here is aligning the correct map image at the correct point in the video.
For this we need to know a little bit about the video (I’ll use GX010044.MP4 in the example).
The framerate of the input video is (11.878533);
ffprobe -v error -select_streams v:0 -show_entries stream=duration -of default=noprint_wrappers=1:nokey=1 GX010044.MP4
11.878533
And for framerate (30000/1001 or 29.97002997):
ffprobe -v error -select_streams v -of default=noprint_wrappers=1:nokey=1 -show_entries stream=r_frame_rate GX010044.MP4
30000/1001
This is also reported as a rounded FPS value at the end of the GX010044.MP4 telemetry json;
"frames/second":30
Keep in mind, videos on GoPro cameras can be shot a varying frames rates. In our example the framerate is 30 FPS, but other GoPro cameras support slower and faster framerates (up to 240 FPS @ 2.7K on the HERO 10).
You can also get total frames (356);
ffprobe -v error -select_streams v:0 -count_packets -show_entries stream=nb_read_packets -of csv=p=0 GX010044.MP4
This actually counts packets instead of frames but it is much faster. Result should be the same. If you want to verify by counting frames change -count_packets to -count_frames and nb_read_packets to nb_read_frames.
A quick note on GoPro GPS
The GoPro GPS sensors capture at 18Hz, so that’s a maximum of 18 GPS points per second.
It is also possible that fewer than 18 points might be reported per second in the telemetry (for example, where there is a lot of obstruction).
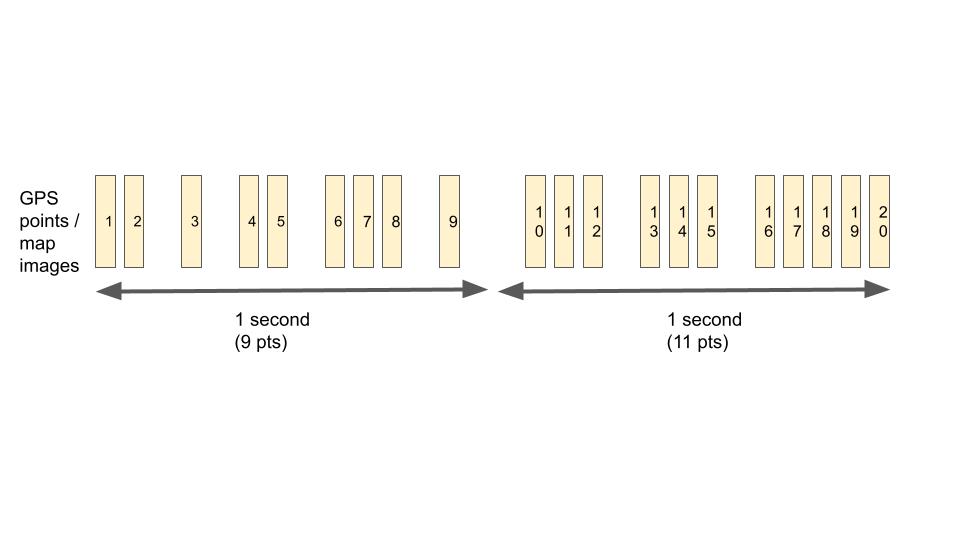
This also means you’re very unlikely to have have an even distribution of GPS points for every second of the video (e.g. 1 second might have 18 GPS points, and the next might only have 5).
End note
As you can see, whilst we have 356 frames over 11.878533 seconds (@30FPS) in the input video GX010044.MP4, we only have 217 GPS points over the same period. Roughly the video has 18.268 GPS points per second (217 / 11.878533).
As I do not want to lower the framerate of the video, I need to dynamically adjust when the map images are shown. As such, some map frames will be shown in the overlay video for longer than others.
To do this we can create a new video from the frames by;
- show the first map image over the start of the video at time 00:00
- load the second map image, and its
ctstime (from the telemetry json) - continue to show the first image until video time >=
ctstime of image 2 - when time >=
ctstime of image 2, show the second map image in the video - load the third map image, and its
ctstime - continue to show the second image until video time >=
ctstime of image 3 - …and so on until the final frame
Once the new video file exists with the map images, we can simply overlay it on the original video in the overlay positions calculated at step 3 (or whatever you want them to be).
The command for GX010044.MP4 would look like this;
ffmpeg -i GX010044.MP4 -i MAP_IMAGES.MP4 -filter_complex [0][1]overlay=eof_action=repeat:x=0.020*W:y=H-h-0.020*H[s0] -map [s0] -map 0:1 -map 0:2 -map 0:3 GX010044-with-overlay.MP4
You can set the coordinates of the overlay filter using x (from left) and y (from top) like so:
You’ll also see I map all the streams using -map [s0] -map 0:1 -map 0:2 -map 0:3. Be careful with this, use ffmpeg to first determine what streams exist in the original video, and update the command above with the correct streams. More about this and how to copy global metadata, essential for equirectangular videos, here.
Automating this flow
This is too much to do manually. Therefore, we created a small script called GoPro Map Overlay that automates this entire process.
You can download it from GitHub here.
The instructions in the readme guide you through the setup and running of the script.
It was used to create the following videos for the examples used in this post.
GX010044.MP4
One of the downsides of MapBox is that it only creates static images with length/width dimensions not exceeding 1280 (mapbox_img_w: 0.24 – 24% is maximum I can pass for this video resolution).
As such the map overlay in this video (5312x2988) appears fairly small. For videos shot with resolutions below 5k, the map overlay will be much more visible (as it will be much larger in the video, assuming you use the same mapbox_img_ percentages as I did below).
variables.txt used:
mapbox_key: REDACTED
mapbox_username: REDACTED
mapbox_base_style: mapbox/outdoors-v11
mapbox_user_style:
mapbox_marker_label: circle
mapbox_zoom_level: 15
mapbox_marker_colour_hex: 3bb2d0
mapbox_line_colour_hex: 3bb2d0
mapbox_line_width: 5
mapbox_img_w: 0.24
mapbox_img_h: 0.24
video_overlay_b_offset:
video_overlay_l_offset:
GS020176.MP4
For equirectangular videos I think this effect works really well.
variables.txt used:
mapbox_key: REDACTED
mapbox_username: REDACTED
mapbox_base_style: mapbox/outdoors-v11
mapbox_user_style:
mapbox_marker_label: circle
mapbox_zoom_level: 15
mapbox_marker_colour_hex: 3bb2d0
mapbox_line_colour_hex: 3bb2d0
mapbox_line_width: 5
mapbox_img_w: 0.15
mapbox_img_h: 0.15
video_overlay_b_offset:
video_overlay_l_offset:
We're building a Street View alternative for explorers
If you'd like to be the first to receive monthly updates about the project, subscribe to our newsletter...
