If you see that your face or license plate requires additional blurring after being captured by a camera car, here’s how you can do it.
All faces and sensitive information (e.g. number plates) captured in our photos are blurred before being publicised.
If people make a specific request for an image to be taken down because it contains their face or property, we will immediately delete it from our database.
Here’s how other popular street-level web apps act on privacy requests…
Google Street View
Google takes a number of steps to protect the privacy of individuals when Street View imagery is published to Google Maps.
We have developed cutting-edge face and license plate blurring technology that is designed to blur identifiable faces and license plates within Google-contributed imagery in Street View.
If you see that your face or license plate requires additional blurring, or if you would like Google to blur your entire house, car, or body, you can also submit a request to Google for it to be blurred, like this one outside a Google office in San Francisco:
Here’s how to submit a blur request to Google:
1) Go to Google Maps and enter the address where the person or object you want to blur is located
2) Enter into Street View mode by dragging the small yellow human-shaped icon, found in the bottom-right corner of the screen, onto the map in front of your house
3) With the person or object in view, click “Report a problem” in the bottom-right corner of the screen
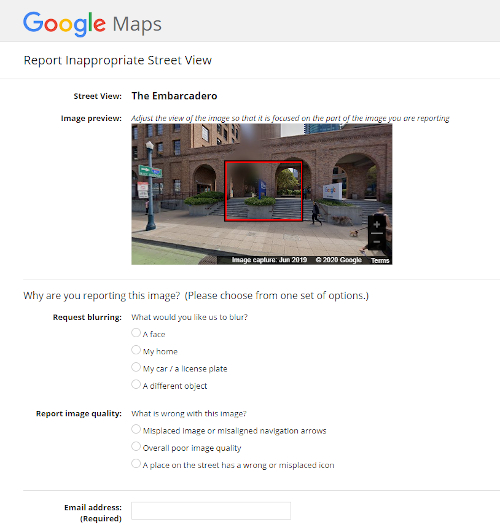
4) Center the red box on the person or object, and select the correct option in the “Request blurring” field
5) Write in the provided field why you want the image blurred (for example, you may be concerned about safety issues)
6) Submit the form
Importantly, be sure it’s what you want. Google warns you that once it has blurred your house on Street View “it is permanent.”
It’s not clear exactly how long Google takes to process the requests.
Bing Streetside
Like Google, Microsoft also implements “industry-leading” blurring software.
So as not to interfere with the privacy of individuals, we’ve developed industry-leading image processing software that automatically blurs faces and vehicle number plates.
They also allow people to flag any image they feel is inappropriate or sensitive for review and possible removal.
To do this from the Bing Maps website;
1) Navigate to the Streetside view in question.
2) Click “Report a privacy concern with this image” text in the lower left corner.
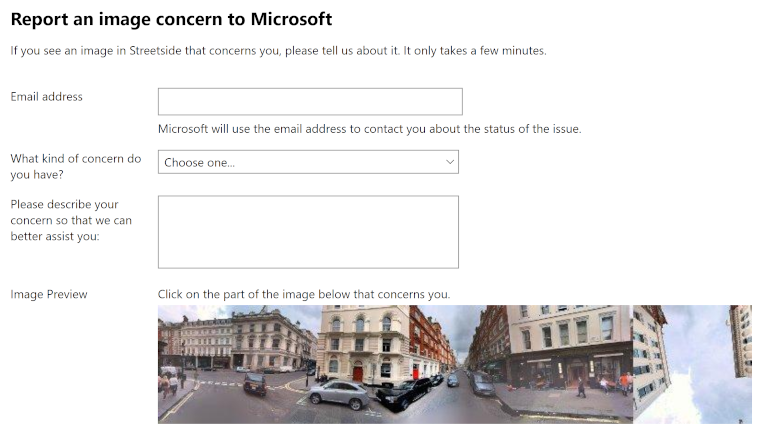
4) Click on the part of the image below that concerns you.
5) Write in the provided fields why you want the image blurred
6) Submit the form
specialists review every request and act quickly to remove objectionable imagery.
Facebook’s Mapillary
Facebook’s Mapillary also employs “state of the art blurring”, but they have the number to back it up. According to this analysis it’s much better than Google’s or Microsoft’s offerings/
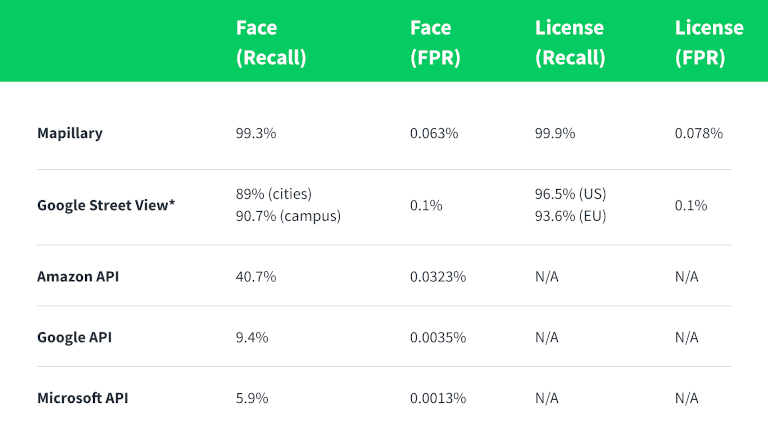
Mapillary also offer the most flexibility when it comes to user submitted blurring.
They have both a blurring and reverse blurring tool built into their web app to allow users to step in if their automatic blurring algorithms fail.
With the blur editor, users are able to blur parts of an image that have been missed or unblur parts of an image that shouldn’t have been blurred.
Each blurring or unblurring request helps their blurring algorithm learn and improve. As such, Mapillary suggests only the following should be blurred:
- Faces
- Vehicle license plates
- Inappropriate or private parts of the image (the alternative is to request deletion of the image)
And what shouldn’t be blurred:
- Whole people
- People from behind when the face is not seen
- Billboards, advertisements, brand labels
- Street, traffic and information signs
To submit blur edits in the Mapillary web app:
1) Select the triple-dot icon (…) when viewing an image
2) Click “Edit privacy blurs”.
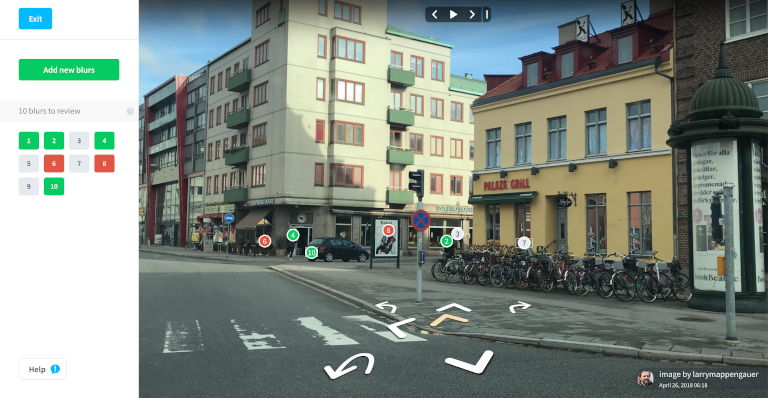
3) You will enter the blur editor mode where you can add and review the blurs applied to the image. All blurs related to the image are marked and numbered in the sidebar as well as in the image. Full information on how to use the Mapillary blur editor can be found in the Mapillary documentation here.
Blurs will get reviewed by a Mapillary admin before actual blurring on the image is updated. The ones that appear faded have been submitted by other users and you can’t take any action on them. Blurs that have been approved by an admin will appear in the “Confirmed” section in the sidebar.
Universal blurring
Unfortunately, there is no universal blurring tool. At present you have to perform these steps with each service manually.
We're building a Street View alternative for explorers
If you'd like to be the first to receive monthly updates about the project, subscribe to our newsletter...
