In this post I will the structure of GoPro’s GPMF standard, how to create a GPMF binary and accompanying metadata, and finally how to inject it into a mp4 video file.
The past five posts have given you a good amount of fundamental knowledge to understand how to write GPMF into videos, all that’s left is to cover the specifics.
A short intro to GPMF
Two great places to start are the following repositories;
- gpmf-write: writes GPMF
- gpmf-parser parses GPMF
What GoPro say inside gpmf-write;
GPMF – GoPro Metadata Format or General Purpose Metadata Format – is a modified Key, Length, Value solution, with a 32-bit aligned payload, that is both compact, full extensible and somewhat human readable in a hex editor. GPMF allows for dependent creation of new FourCC tags, without requiring central registration to define the contents and whether the data is in a nested structure. GPMF is optimized as a time of capture storage format for the collection of sensor data as it happens.
https://github.com/gopro/gpmf-write
OK, that’s quite a mouthful. I promise by the end of this post it will all make sense.
Let us start by going back to basics, and the boxes used by GMPF;
ftyp [type ‘mp41’]
mdat [all the data for all tracks are interleaved]
moov [all the header/index info]
    ‘trak’ subtype ‘vide’, name “GoPro AVC”, H.264 video data
    ‘trak’ subtype ‘soun’, name “GoPro AAC”, to AAC audio data
    ‘trak’ subtype ‘tmcd’, name “GoPro TCD”, starting timecode (time of day as frame since midnight)
    ‘trak’ subtype ‘meta’, name “GoPro MET”, GPMF telemetry
This should all look familiar from the previous posts.
The biggest difference between CAMM and GPMF is the way the telemetry samples are written in the mdat binary.
Raw telemetry (inside mdat media)
To begin with, it is worth familiarising yourself with the data that GPMF supports (put another way, the types and values of telemetry that can be recorded).
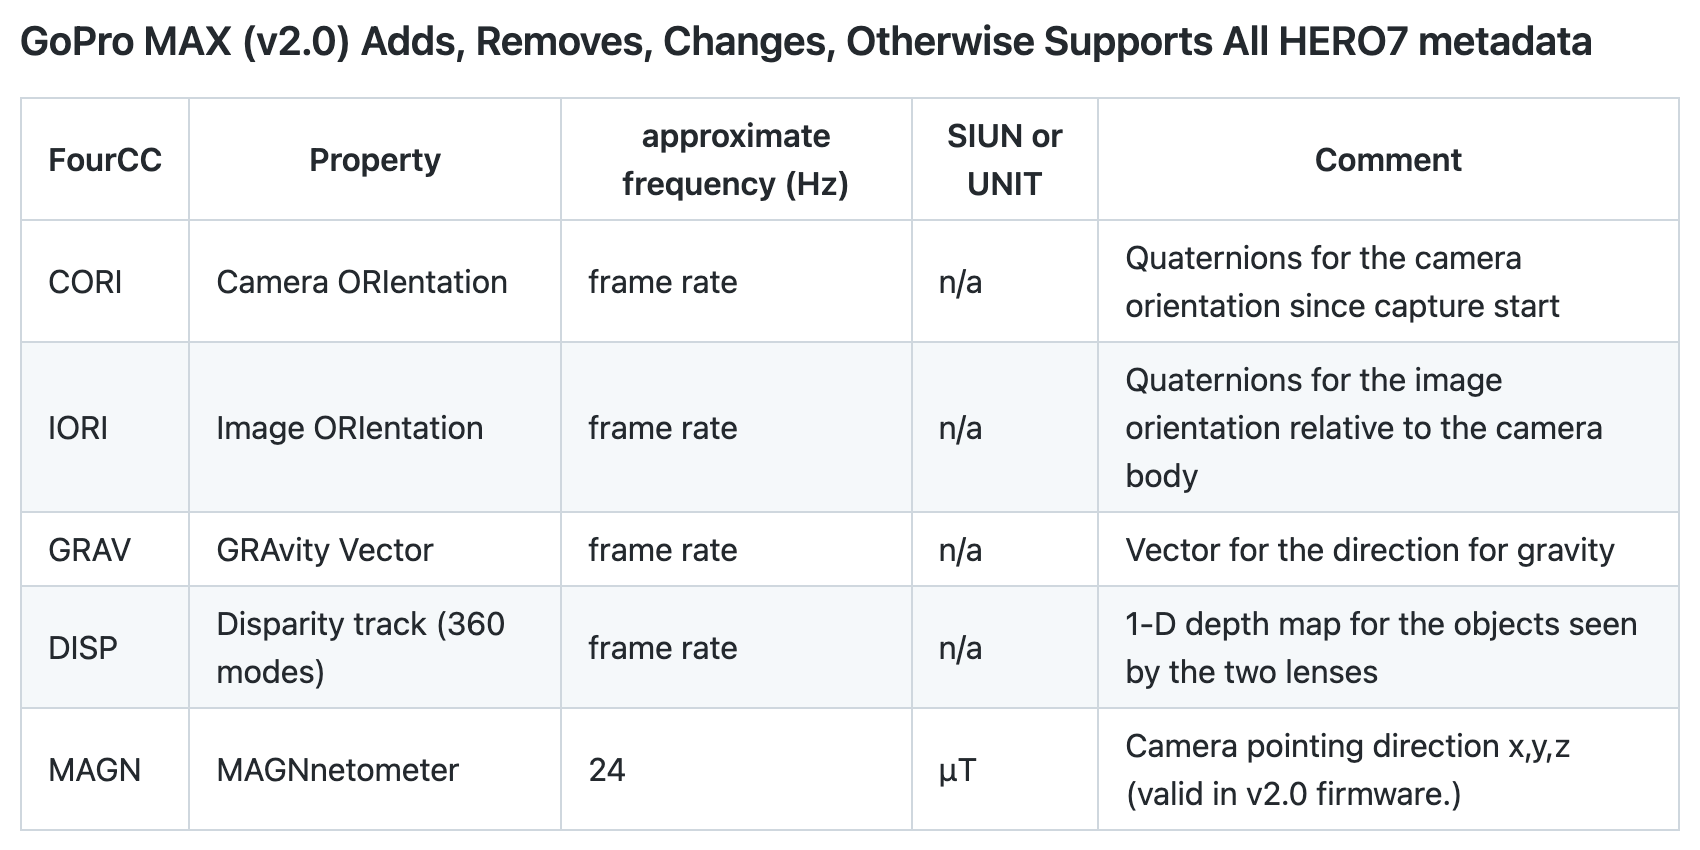
Above is a snippet of what telemetry the GoPro MAX writes into GPMF as it builds the video file.
This is written into the mdat as a stream in the following structure;

Each part of the tree has a Key, Length Value structure.
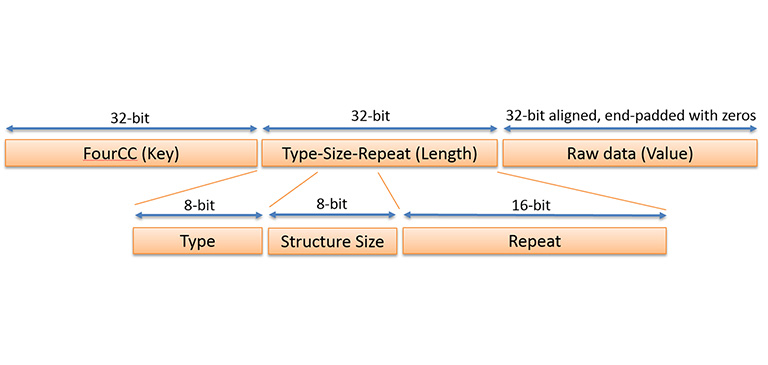
Broken out this looks as follows;
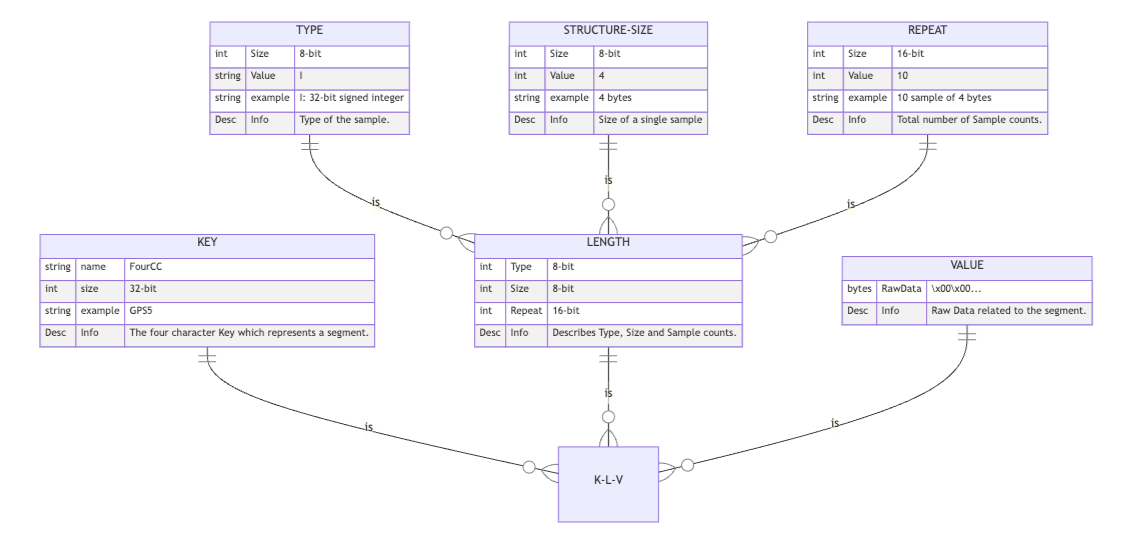
Which in more detail can be explained as;
- Four Character Key (FourCC): for the sample type (FourCC column shown in the MAX example above has
CORI,IORI,GRAV,DISP, andMAGN) - Length: length of the entry split into 3 parts
- Type: The final 8-bits, Type, is used to describe the data format within the sample. Just as FOURCC Keys are human readable, the TYPE is using a ASCII character to describe the data stored. All box types are described here)
- Structure Size: Size of sample. 8-bits is used for a sample size, each sample is limited to 255 bytes or less.
- Repeat: total number of samples from all telemetry streams. 16-bits is used to indicate the number of samples in a GPMF payload, this is the Repeat field.
- Value: the actual sample data (or in the case of containers, the nested box)
I’ll jump into some of the key FourCC entries below needed for our use case (write a GPX file into a video), but be warned, this is not an exhaustive explanation and things are missing as a result. Be sure to review the full GPMF specification.
Telemetry descriptions in mdat
Let’s start with the DEVC box (unique device source for metadata) at the top of the tree. A separate DEVC is used for each data generating device. In the case of GoPro cameras (with no accessories), there will only be one DEVC entry, for the camera.
We can now convert the length property values to binary and write this in preparation for adding to the mdat media;
python3
import struct

## Create box elements

DEVC_key = b'DEVC'
DEVC_type = struct.pack(">b", 0)
DEVC_structure_size = struct.pack(">b", 1)
DEVC_repeat = struct.pack('>H', 260)

## Create final box elements

DEVC_box = (DEVC_key+DEVC_type+DEVC_structure_size+DEVC_repeat)

print(DEVC_box)
Let’s break this down in the KLV structure;
- FourCC:
DEVCis Four Character Key. - Length:
- Type: is 0 which means that this segment is a container (it holds other boxes in the tree) – see in spec; “Optionally NULL terminated - size/repeat sets the length”
- Structure size: 1, again because is container
- Repeat: now we don’t actually have the data needed to write this. This is essentially the size of all the following boxes (which I’ve just made up as being 260 bytes here)
- Value: As this is a container box, there is no value, the next box will follow.
As you’ll see this code prints DEVC\x00\x01\x01\x04 – the start of our raw telemetry in the mdat media.
Now we can add the DVID fourCC data. This is an auto generated unique-ID for managing a large number of connect devices, camera, ect. For this explanation I’ll keep it simple and assume we have a single device (as GoPro cameras do). The ID will equal 1.
Writing this out;
python3
import struct

## Write entries

DVID_value = struct.pack('>I', 1)

## Print entry

len(DVID_value)
Which gives us a length of 4 which we can use in the next part for DVID_structure_size;
python3
import struct

## Create final

DVID_key = b'DVID'
DVID_type = b'L'
DVID_structure_size = struct.pack(">b", 4)
DVID_repeat = struct.pack('>H', 1)

DVID_box = (DVID_key+DVID_type+DVID_structure_size+DVID_repeat+DVID_value)

print(DVID_box)
Again, let’s break this down in the KLV structure;
- FourCC:
DVIDis Four character key. - Length:
- Type:
L(a 32-bit unsigned integer) - Structure size: length of the Value in bytes
- Repeat: is 1 because only one ID in this example
- Type:
- Value: value is 1 (that’s the ID we’ll give to our sample)
Which put together gives; DVIDL\x04\x00\x01\x00\x00\x00\x01
Finally, the other descriptive box before the raw telemetry samples is DVNM.
This simply displays the name of the device. If the telemetry was produced by a GoPro MAX camera you would see “GoPro Max”. This entry is for communicating to the user the data recorded, so it should be informative.
Following the same approach as before;
python3
import struct

## Write entries

DVNM_value = b'Trek View Demo Blog'

## Print length

len(DVNM_value)
Which gives 19;
python3
import struct

## Write entries

DVNM_key = b'DVNM'
DVNM_type = b'c'
DVNM_structure_size = struct.pack(">b", 19)
DVNM_repeat = struct.pack('>H', 1)
DVNM_value = b'Trek View Demo Blog'

## Write final box

DVNM_box = (DVNM_key+DVNM_type+DVNM_structure_size+DVNM_repeat+DVNM_value)

print(DVNM_box)
Which prints; DVNMc\x13\x00\x01Trek View Demo Blog
But there is another important consideration here, as per the GoPro specification values must be 32 bit aligned (see the image of the KLV design above) – this also explains why we use the stco box in the telemetry metadata (and not co64 like CAMM).
For instance, in a 32-bit architecture, the data may be aligned if the data is stored in four consecutive bytes and the first byte lies on a 4-byte boundary
In the DVID the value was 4 bytes, so this was 32 bit aligned. In our example, the DVNM_value value is 19 bytes;
python3

len(DVNM_value)
The next 4-byte boundary is at 20 bytes, thus we need to pad the value with one zero as per the specification (to make it equal to 20 bytes), which gives a final value DVNM_value of Trek View Demo Blog\x00 and a complete DVID box; DVNMc\x13\x00\x01Trek View Demo Blog\x00.
So far our telemetry data looks like this;
DEVC\x00\x01\x01\x04
DVIDL\x04\x00\x01\x00\x00\x00\x01
DVNMc\x13\x00\x01Trek View Demo Blog\x00
Now these informational boxes are covered lets move to the STRM, where the actual telemetry is held.
Telemetry samples in mdat
Now these informational boxes are covered lets move to the STRM (stream) box, that captures the raw telemetry.
Each metadata device can have multiple streams on sensor data, for example a camera could have GPS, Accelerometer and Gyroscope sensors producing three individual streams of telemetry.
As linked earlier these are all described here.
Jumping straight into it, here’s a raw example of GPMF telemetry taken from a GoPro MAX;
STRM\x00\x01\x05\\
	STMPJ\x08\x00\x01\x00\x00\x00\x00\x1c\xc4\xc4\x19
	TSMPL\x04\x00\x01\x00\x01z\xe8
	STNMc\r\x00\x01Accelerometer\x00\x00\x00
	MTRXf$\x00\x01\x00\x00\x00\x00\xbf\x80\x00\x00\x00
	ORINc\x03\x00\x01XzY\x00
	ORIOc\x03\x00\x01ZXY\x00
	SIUNc\x04\x00\x01m/s\xb2
	SCALs\x02\x00\x01\x01\xa1\x00\x00
	TMPCf\x04\x00\x01A\xfd\x84\x00
	ACCLs\x06\x00\xc9\xfa\xf0\xf5\xd4\

STRM\x00\x01\x13x
	STMPJ\x08\x00\x01\x00\x00\x00\x00\x1c\xc4\xca\xb3
	TSMPL\x04\x00\x01\x00\x05\xeb\xa0
	STNMc\t\x00\x01Gyroscope\x00\x00\x00
	MTRXf$\x00\x01\x00\x00\x00\x00\xbf\x80\x00\x00\x00
	ORINc\x03\x00\x01XzY\x00
	ORIOc\x03\x00\x01ZXY\x00
	SIUNc\x05\x00\x01rad/s\x00\x00\x00
	SCALs\x02\x00\x01\x03\xab\x00\x00
	TMPCf\x04\x00\x01A\xfd\x84\x00
	GYROs\x06\x03#\x00\xbb\xfdu\x00N\x00\xbc\xfd}
Note, the values above have been cut in places for brevity in this post.
Hopefully this has your brain whirring. Let me break this down.
Samples are each nested within a STRM. Multiple entries can be captured in a STRM (if they occur at the same time), but generally each STRM box tends to contain a measurement from a single sensor. For example, in the above example there are two STRM entries, one with GYRO (gyroscope) and one with ACCL (accelerometer). These sensors reports many samples per second, so there will be many more STRM entries for these samples to follow.
The STRM box itself is written like so;
python3
import struct

## Create all box elements

STRM_key = b'STRM'
STRM_type = struct.pack(">b", 0)
STRM_structure_size = struct.pack(">b", 9)
STRM_repeat = struct.pack('>H', 1)
STRM_value = struct.pack('>I', 1)

## Create final box

STRM_box = (STRM_key+STRM_type+STRM_structure_size+STRM_repeat+STRM_value)

print(STRM_box)
Let me clear some of the up. The;
- Type: is 0 because as like
DEVCthis segment is a container. - Structure: length is
1as box doesn’t really contain anything, except the nested boxes - Repeat: We don’t actually have the data to populate this value yet, but is essentially saying there are
9nested boxes (e.g.GPS5) in thisSTRM. TheSTRMforGYROandACCLsamples above both have 10 nested boxes, hence Repeat equals 10 for thereSTRMentries - Value: none as box is container (the values are the nested box)
Which gives us the first STRM sample container box; STRM\x00\t\x00\x01\x00\x00\x00\x01
Now we have to consider the nested boxes that are contained in STRM. As noted earlier for GoPro cameras the actual boxes that appear here is dependent on the camera used. Below I’ll work through some of the more common FourCC boxes used for GPS samples.
If you look at the two samples above you will see many of the FourCCs in each STRM are found in both entries (e.g. STMP, TSMP, etc.). These too are relevant for GPS samples. Let’s look at one example STMP;
The STMP holds microsecond timestamp values.
First we need to calculate the size of our value.
python3
import struct

## Write entries

STMP_value = struct.pack('>Q', 1001)

## Print length of entry

len(STMP_value)
It prints 8 (bytes), which we can now use in the STMP_structure_size field like so;
python3
import struct

## Create all box elements

STMP_key = b'STRM'
STMP_type = b'J'
STMP_structure_size = struct.pack(">b", 8)
STMP_repeat = struct.pack('>H', 1)

## Create final box

STMP_box = (STMP_key+STMP_type+STMP_structure_size+STMP_repeat+STMP_value)

print(STMP_box)
Note STMP_repeat as there is only one value in this entry (1001).
The output of the code prints; STRMJ\x08\x00\x01\x00\x00\x00\x00\x00\x00\x03\xe9, our STMP entry.
So right now we have the following data;
DEVC\x00\x01\x01\x04
DVIDL\x04\x00\x01\x00\x00\x00\x01
DVNMc\x13\x00\x01Trek View Demo Blog\x00

STRM\x00\t\x00\x01\x00\x00\x00\x01
	STRMJ\x08\x00\x01\x00\x00\x00\x00\x00\x00\x03\xe9
Hopefully you’re getting the hand of things now.
Let’s now look at a GPS5 sample as it is slightly more complex in what you need to consider (more than just the GPS5 box).
First-things-first, the GPS5 holds GPS samples with the following data (I’ve also included some example values):
- latitude = 51.2600777
- longitude = -0.9531694
- altitude (WGS 84) = 126.2
- 2D ground speed = 0.865
- 3D speed = 0.89
BUT, these value are not written into the telemetry GPS5 as you see above, the GPMF standard requires them to be converted into integers.
This is where the SCAL box comes into play.
Sensor data often needs to be scaled to be presented with the correct units. SCAL is a divisor.
Essentially we need a scale that turns these values to integers. For our values above these scales are as follows;
- latitude = 51.2600777 * 10000000 (scale) = 512600777
- longitude = -0.9531694 * 10000000 (scale) = -9531694
- altitude (WGS 84) = 126.2 * 10 (scale) = 1262
- 2D ground speed = 0.865 * 1000 (scale) = 865
- 3D speed = 0.89 * 100 (scale) = 89
With this information we then write these as values into the SCAL box.
python3
import struct

## Write entries

SCAL_value_latitude = struct.pack('>I', 10000000)
SCAL_value_longitude = struct.pack('>I', 10000000)
SCAL_value_altitude = struct.pack('>I', 10)
SCAL_value_2d_speed = struct.pack('>I', 1000)
SCAL_value_3d_speed = struct.pack('>I', 100)

SCAL_box = (SCAL_value_latitude + SCAL_value_longitude + SCAL_value_altitude + SCAL_value_2d_speed + SCAL_value_3d_speed)

## Print length of each entry

len(SCAL_value_latitude)
len(SCAL_value_longitude)
len(SCAL_value_altitude)
len(SCAL_value_2d_speed)
len(SCAL_value_3d_speed)

## Print all entries

len(SCAL_samples)
Each entry has a length of 4 bytes, (SCAL_structure_size) and there a 5 entries total (SCAL_repeat). Altogether they have a total length of 20 bytes, so we can now write the whole SCAL object like so;
## Create all box elements

SCAL_key = b'SCAL'
SCAL_type = b'l'
SCAL_structure_size = struct.pack(">b", 4)
SCAL_repeat = struct.pack('>H', 5)

## Create final box

SCAL_box = (SCAL_key + SCAL_type + SCAL_structure_size + SCAL_repeat + SCAL_samples)

print(SCAL_box)
Which gives us a SCAL box for this sample a SCALl\x04\x00\x05\x00\x98\x96\x80\x00\x98\x96\x80\x00\x00\x00\n\x00\x00\x03\xe8\x00\x00\x00d.
Now we can write the GPS5 box using the values we calculated above. Let’s go through that in the same way;
python3
import struct

GPS5_value_latitude = struct.pack('>I', 512600777)
GPS5_value_longitude = struct.pack('>i', -9531694)
GPS5_value_altitude = struct.pack('>I', 1262)
GPS5_value_2d_speed = struct.pack('>I', 865)
GPS5_value_3d_speed = struct.pack('>I', 89)

GPS5_samples = (GPS5_value_latitude + GPS5_value_longitude + GPS5_value_altitude + GPS5_value_2d_speed + GPS5_value_3d_speed)

## Print length of each entry

len(GPS5_value_latitude)
len(GPS5_value_longitude)
len(GPS5_value_altitude)
len(GPS5_value_2d_speed)
len(GPS5_value_3d_speed)

## Print all entries

len(GPS5_samples)
Again each entry is 4 bytes, making a total of 20 bytes, meaning we can write the GPS5 box like so
## Create all box elements

GPS5_key = b'GPS5'
GPS5_type = b'l'
GPS5_structure_size = struct.pack(">b", 4)
GPS5_repeat = struct.pack('>H', 5)

## Create final box

GPS5_box = (GPS5_key + GPS5_type + GPS5_structure_size + GPS5_repeat + GPS5_samples)

print(GPS5_box)
Which gives; GPS5l\x04\x00\x05\x1e\x8d\xaa\xc9\xffn\x8e\xd2\x00\x00\x04\xee\x00\x00\x03a\x00\x00\x00Y.
Putting all this together, our first GPS sample is taking shape nicely;
DEVC\x00\x01\x01\x04
DVIDL\x04\x00\x01\x00\x00\x00\x01
DVNMc\x13\x00\x01Trek View Demo Blog\x00

STRM\x00\t\x00\x01\x00\x00\x00\x01
	STRMJ\x08\x00\x01\x00\x00\x00\x00\x00\x00\x03\xe9
	SCALl\x04\x00\x05\x00\x98\x96\x80\x00\x98\x96\x80\x00\x00\x00\n\x00\x00\x03\xe8\x00\x00\x00d
	GPS5l\x04\x00\x05\x1e\x8d\xaa\xc9\xffn\x8e\xd2\x00\x00\x04\xee\x00\x00\x03a\x00\x00\x00Y
Note there are a few other box types with a relation to GPS5 that also need to be written;
STNM: order of values in the boxUNIT: the unit used (e.g. degrees)GPSP: GPS precisionGPSF: GPS FixGPSU: UTC time and data from GPSGPSA: altitude system used
I won’t go into each of these, nor the other sensor box types (e.g. ACCL, GYRO, etc.). You have enough information to start writing these yourself with the help of the specification.
OK now the raw telemetry is written into the mdat media, now we need to describe it in the movie box (moov).
Telemetry metadata (inside moov box)
Inside the meta trak for the gpmf telemetry you’ll see more nested boxes as per the specification;
'moov'
	'trak'
	    'tkhd' < track header data >
	    'mdia'
	        'mdhd' < media header data >
	        'hdlr' < ... Component type = 'mhlr', Component subtype = 'meta', ... Component name = “GoPro MET” ... >
	        'minf'
		        'gmhd'
		            'gmin' < media info data >
		            'gpmd' < the type for GPMF data >
		        'dinf' < data information >
		        'stbl' < sample table within >
		            'stsd' < sample description with data format 'gpmd', the type used for GPMF >
		            'stts' < GPMF sample duration for each payload >
		            'stsz' < GPMF byte size for each payload >
		            'stco' < GPMF byte offset with the MP4 for each payload >
The boxes contain the day are almost identical to CAMM. You can see how the boxes are structured (and the data they contained) in the tree above.
First lets start by printing the trak box from a real GoPro 360 video shot on a GoPro MAX to show this structure;
python3 print_video_atoms_overview.py GS018423.mp4
Which prints;
     └── b'trak' [8, 574]
         ├── b'tkhd' [8, 84]
         ├── b'mdia' [8, 438]
         │   ├── b'mdhd' [8, 24]
         │   ├── b'hdlr' [8, 34]
         │   └── b'minf' [8, 356]
         │       ├── b'gmhd' [8, 24]
         │       ├── b'dinf' [8, 28]
         │       └── b'stbl' [8, 280]
         │           ├── b'stsd' [8, 24]
         │           │   └── b'gpmd' [8, 8]
         │           ├── b'stsz' [8, 88]
         │           ├── b'stsc' [8, 20]
         │           ├── b'stco' [8, 84]
         │           └── b'stts' [8, 24]
         └── b'edts' [8, 28]
Now, switching back to my example. have only one sample entry, as shown earlier in this post. Let’s assume the mdat box has 1,000,000 bytes of video and audio, followed by this telemetry cappended starting at 1,000,001 bytes.
I’m not going to go into as much detail as I did with CAMM, but here’s a few entries to show you that the theory is identical between the two standards (with a few small things to be aware of).
stsd (and gpmf) box
The sample description table for gpmf will look something like this;
8,gpmf,0,1
That is in my example; the row is 8 bytes, the data type is gpmf (always the case for gpmf), format reserved data 0, and the data reference index is 1.
stts (time to sample box) box
Let’s assume the timescale in the mdhd box is defined as 90000.
Our single point covers 1 second.
Therefore we get the following time-to-sample table
1,90000
Like last week we can use Telemetry Injector to write the binary.
vi stts.json
{"version": 0, "flags": [0, 0, 0], "entries": [[1,90000]]}
Which can then be passed to the script;
python3 sttsBox.py -l stts.json
b'\x00\x00\x00\x18stts\x00\x00\x00\x00\x00\x00\x00\x01\x00\x00\x00\x01\x00\x01_\x90'
stsz (sample size box)
As we’re dealing with GoPro GPS5 telemetry only we know that each sample is exactly 220 bytes (and in this example we only have 1 sample), which gives a sample size table of;
220
Note, if there were other types of samples, e.g. ACCL, the bytes sizes would be different.
stsc (sample to chunk box)
My telemetry only contains I will assign each sample to a chunk, giving a sample to chunk data element in the stsc box as follows;
1,3,1
Here we have 1 chunk, that contains 3 measurements (STRM, SCAL, GPS5) that map to the stsd table data reference index ID 1.
stco (chunk offset box)
Our telemetry sample is at 1,000,001 bytes giving a chunk offset table as follows;
1000001
Next Up: Telemetry Injector
Now you’re up to speed with the basics, next week I will fully introduce you to our tool, Telemetry Injector, that takes either a movie file and GPX file, or a series of geotagged images and creates a video with CAMM or GPMF telemetry.
If you’re still struggling to understand some of the concepts introduced in this series of post, Telemetry Injector will show you from end-to-end how telemetry is injected and written into mp4 video files.
We're building a Street View alternative for explorers
If you'd like to be the first to receive monthly updates about the project, subscribe to our newsletter...
