Taking apart a .360 file to reveal its contents to try and understand how it can be processed (without GoPro software).
Last week I looked at some of the theory behind the GoPro’s proprietary .360 format.
This week I’ll use a video I shot on a Trek Pack v2 (GoPro Max) to try and understand how to work with .360’s in practice.
Here’s a GoPro video shot at 6K / 30 FPS on the MAX camera.
It was uploaded to YouTube after being converted from .360 to .mp4 (EAC to equirectangular projection) in GoPro Studio.
You can download the mp4 file (GS070135.mp4) here.
I can extract a frames from this .mp4 video with ffmpeg by following the instruction in my post; Turning a 360 Video into Timelapse Images.
For this example, I’ll use 1 frame every second:
$ ffmpeg -i GS070135.mp4 -r 1 -q:v 2 MP4-FRAMES/img%d.jpg

Above is the first frame (reduced in resolution for this post, original = 4096x2048) from the extraction, img1.jpg.
Now going back a step, let’s look at the original .360 file (download it here).
Looking at the metadata from the .360 file:
$ exiftool -ee -G3 -api LargeFileSupport=1 -X GS070135.360 > GS070135-360.txt
Although it’s a .360 file format, GoPro actually declare it as an .mp4:
<File:FileType>MP4</File:FileType>
<File:FileTypeExtension>mp4</File:FileTypeExtension>
<File:MIMEType>video/mp4</File:MIMEType>
We know from last weeks post, there are two video tracks in the file (you can also see this in the exif):
<Track1:HandlerDescription>GoPro H.265</Track1:HandlerDescription>
<Track6:HandlerDescription>GoPro H.265</Track6:HandlerDescription>
Thus, running the ffmpeg command used before, e.g.
$ ffmpeg -i GS070135.360 -r 1 -q:v 2 FRAMES/img%d.jpg
Would run, but would only extract one track.
This command only looks for a single video track to extract (as mp4’s typically contain a single video track).
Therefore we need to explictly define the tracks for extraction. In the case of .360’s this is track 0 and 5:
$ ffmpeg -i GS070135.360 -map 0:0 -r 1 -q:v 2 track0/img%d.jpg -map 0:5 -r 1 -q:v 2 track5/img%d.jpg
Note, this extracts at 1 FPS (-r 1). ffmpeg counts from 0, so Track1 in exiftool output is Track0 in ffmpeg.
You can also copy the video file from each track, if needed:
$ ffmpeg -i GS070135.360 -map 0:0 -vcodec copy -acodec copy track0.mp4 -map 0:5 -vcodec copy -acodec copy track5.mp4
Track 0 img1.jpg:

Track 5 img1.jpg:

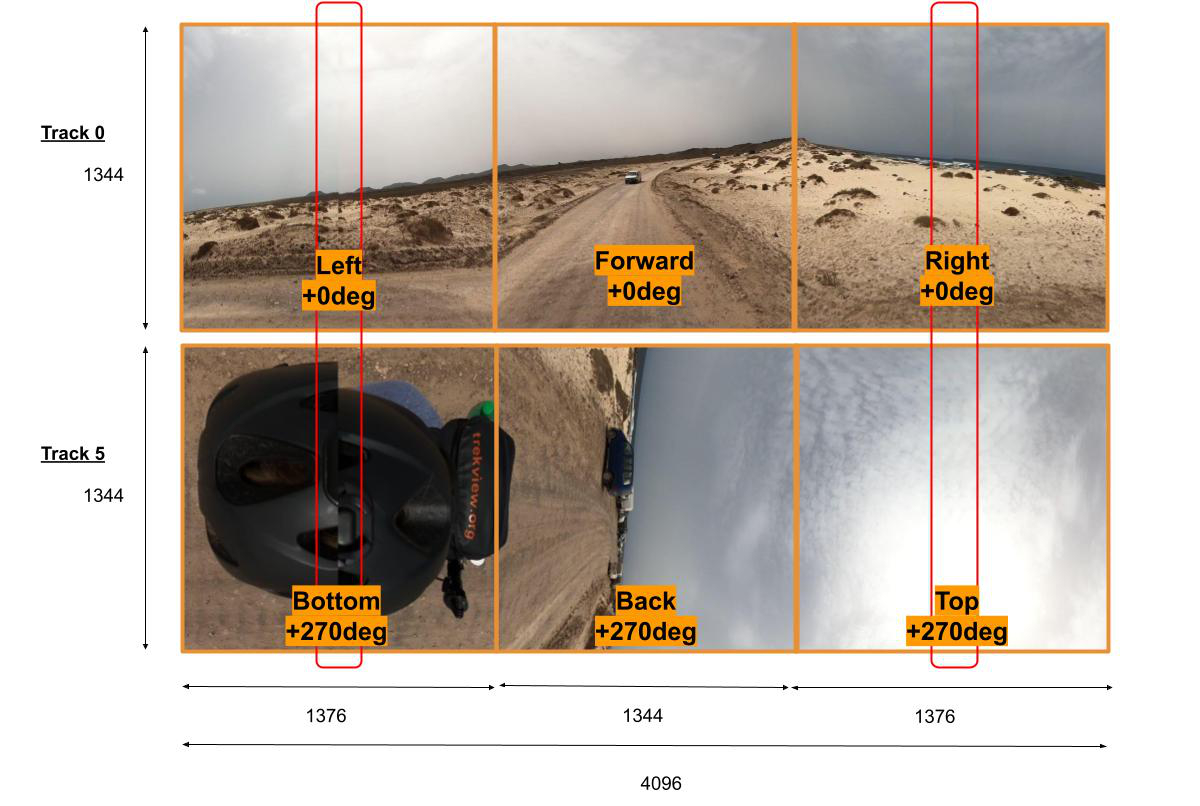
Above is the first frame (reduced in resolution for this post, originals = 4096x1344) for each track of the extraction, img1.jpg.

Download on Google Drawings here.
Above are the two images in one track (0 at top, 5 at bottom). I have also added a grid to display each cube annotated with its direction and rotation.
You can create a video file of the two track jpgs in ffmpeg to get this frame like so:
$ ffmpeg -i GS070135.360 -filter_complex "[0:0]pad=4096:2688[put],[put][0:5]overlay=x=0:y=1344" GS070135-eac.mp4
But really this video is useless. In EAC (or GoPro EAC) projection, other software won’t be able to read it. It needs to be converted to equirectangular.
We're building a Street View alternative for explorers
If you'd like to be the first to receive monthly updates about the project, subscribe to our newsletter...


