In this post I will show you how to use these tags to ensure your equirectangular images and videos are loaded correctly in viewers.
Over the last few weeks I have talked about how to adjust for roll, pitch, yaw, and heading by modifying the visual element of video and image files.
Sometimes this is overkill as it is possible to achieve the same result using the metadata of a photo or video. As you will see in the demos later in this post, the visual content of the image or video remains unchanged (they all look identical), only the metadata used to render it changes.
Many viewers use GPano (photo) and GSpherical metadata tags to render equirectangular content.
I have talked previously about the importance of setting GPano:ProjectionType = equirectangular and GSpherical:ProjectionType = equirectangular for photo and video files respectively to ensure 360 viewer controls are shown.
However, there are a number of other useful metadata tags in these specifications that can be used to adjust roll, pitch and yaw in the viewer.
An important note on 360 video/photo viewers
In parts of this post I am going to be using the Facebook photo viewer to display photos. Pannellum, like many other photo viewers, does not support the use of XMP-GPano:InitialViewXXX tags (it only supports XMP-GPano:PoseXXX tags). Therefore for all demos of XMP-GPano:InitialViewXXX photos I will use Facebook.
I will use Facebook for rendering videos, which fully supports the XMP-GSpherical specification. There are video viewers (inc. YouTube!) that only have partial support the specification (and crucially not the XMP-GSpherical:InitialViewXXX tags).
You should keep this in mind based on how you plan to share content.
Using GPano tags 360 images
You can see the full Google Photosphere (GPano) specification here: https://developers.google.com/streetview/spherical-metadata
In terms of roll, pitch and yaw the relevant tags are
GPano:PoseHeadingDegrees(>= 0 and < 360): Compass heading, measured in degrees clockwise from North, for the center the image.GPano:PosePitchDegrees(>= -90 and <= 90): Pitch, measured in degrees above the horizon, for the center in the image.GPano:PoseRollDegrees(> -180 and <= 180): Roll, measured in degrees, of the image where level with the horizon is 0. As roll increases, the horizon rotates counterclockwise in the image.GPano:InitialViewHeadingDegrees(>= 0 and < 360): The heading angle of the initial view in degrees clockwise from real world North, not relative to the pano center.GPano:InitialViewPitchDegrees(>= -90 and <= 90): The pitch angle of the initial view in degrees above the real world horizon, not relative to the pano center.GPano:InitialViewRollDegrees(> -180 and <= 180): The roll angle of the initial view in degrees where level with the real world horizon is 0. As roll increases, the horizon rotates counterclockwise in the view.
It is first important to understand the difference between Pose and InitialView tags for roll, pitch and heading tags.
Pose values are all relative to the center of the image – not the actual “real world” axis.
Let me explain with an example.
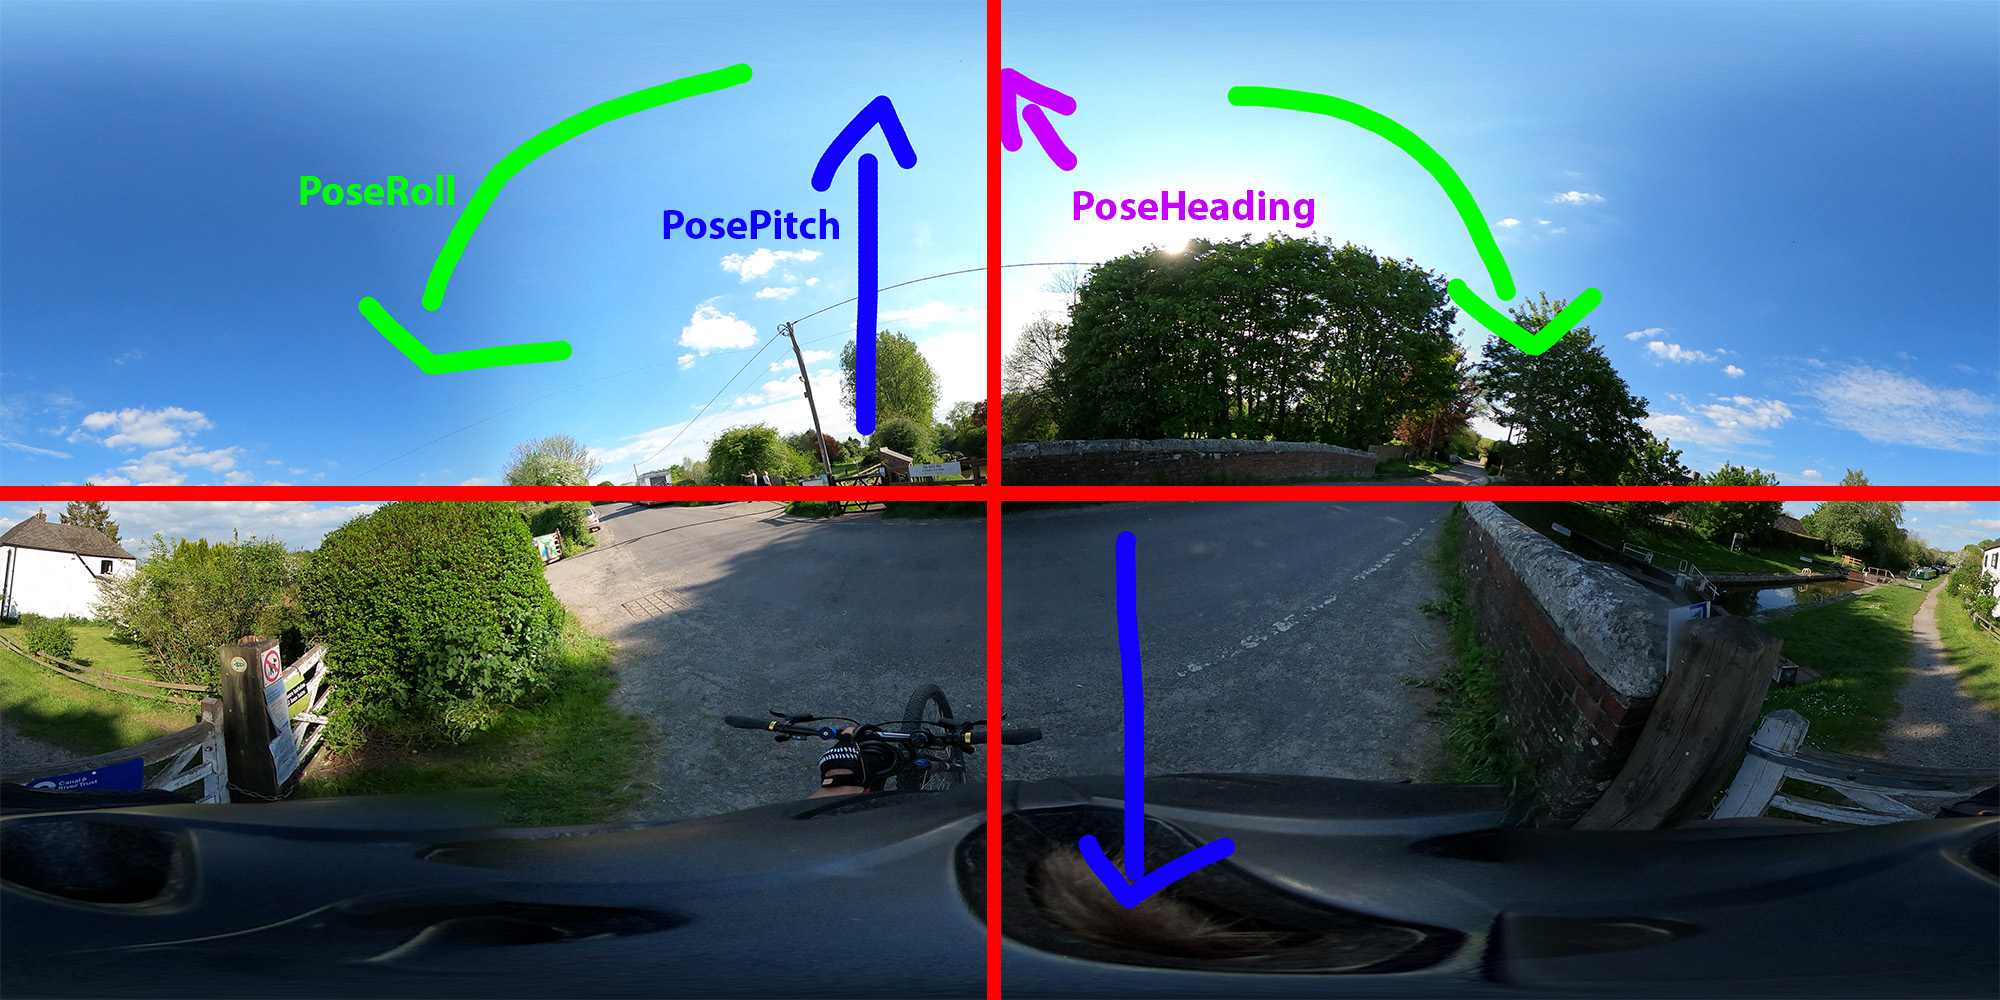
The red lines in the image above annotate the center of the image – the red x line (from left to right) shows the center of the image for pitch. Therefore the PosePitchDegrees = 0 in this image.
Lets say I take a photo with a pitch of 45 degrees (pitching the camera 45 degrees above the “real world” horizon).
In this case, the center of the image will show the sky directly ahead of the camera as it is tilting upwards.
Let me artificially modify the pitch of the last image to demonstrate this visually.
ffmpeg -i GSAQ3296.jpg -vf v360=e:e:pitch=45 GSAQ3296-modpitch45.jpg
exiftool -TagsFromFile GSAQ3296.jpg "-all:all>all:all" GSAQ3296-modpitch45.jpg
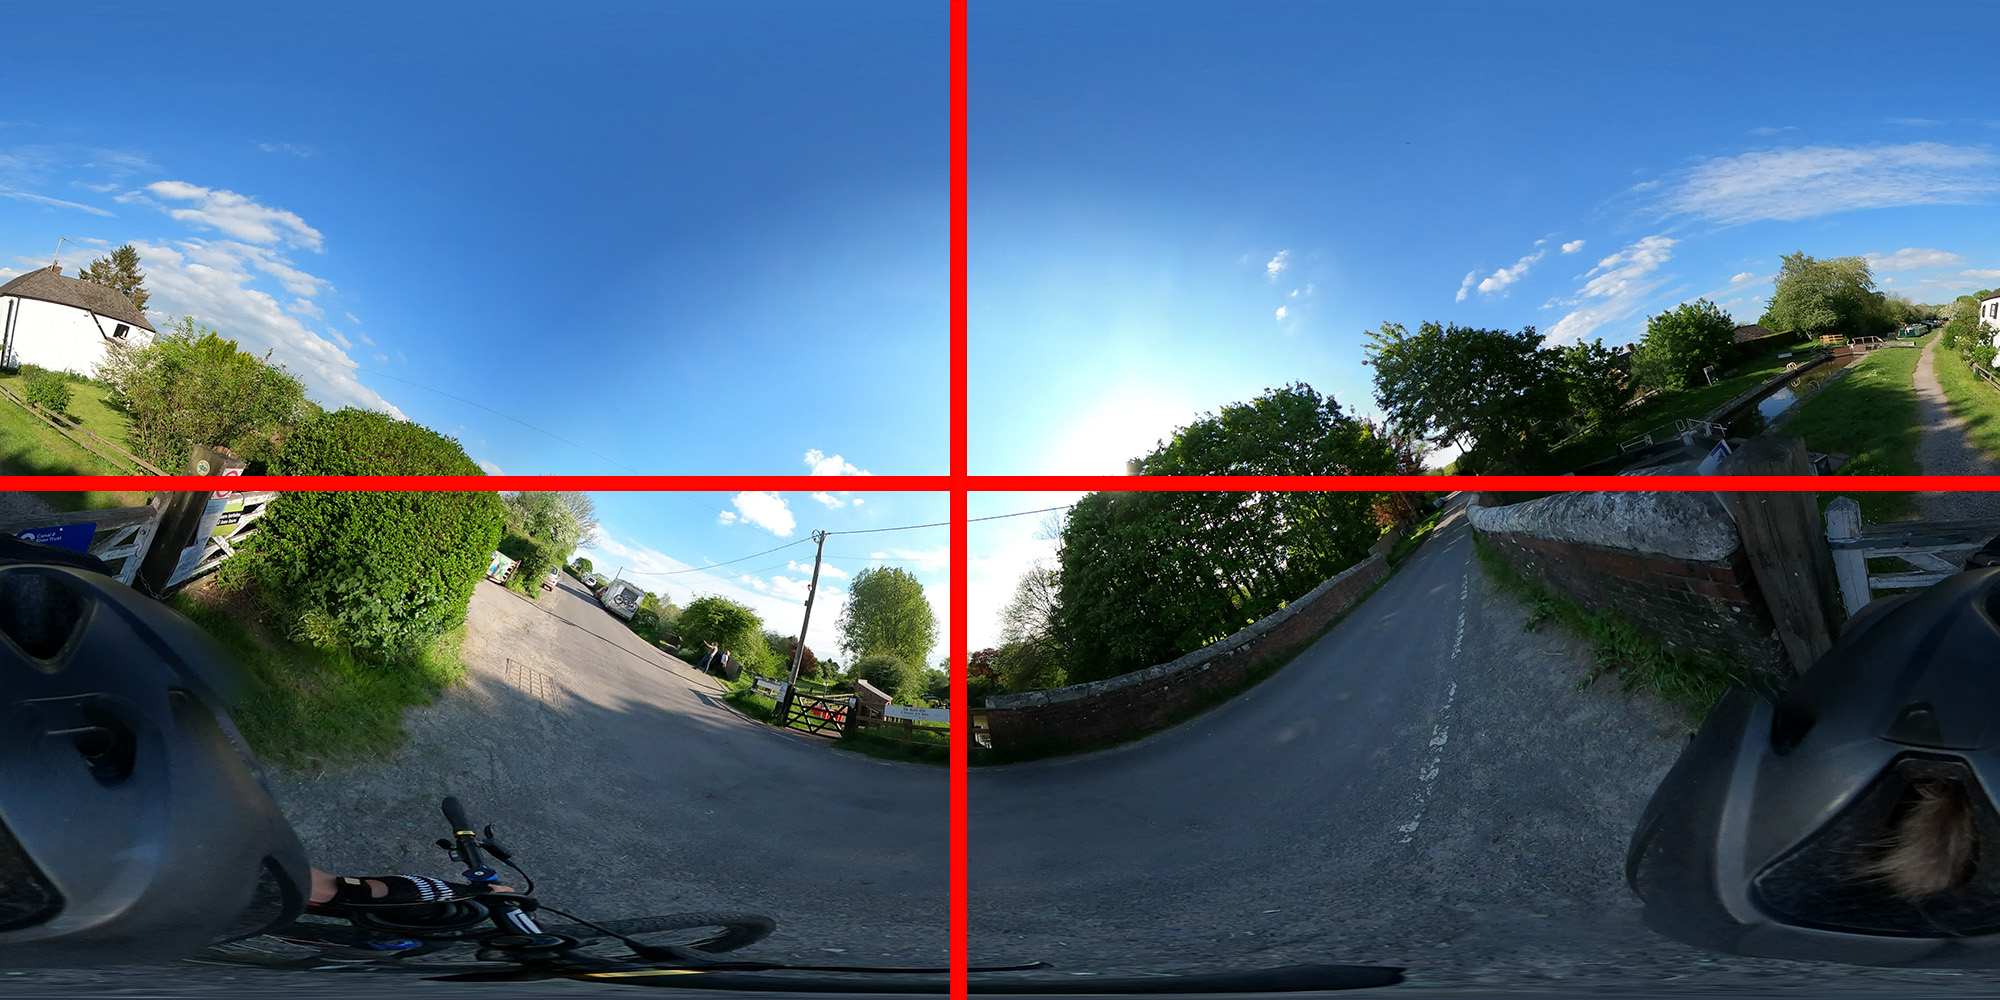
Again, PosePitchDegrees here is still 0, relative to the center of the photo (the red line), even though it is actually different to the first image (before I modified pitch).
Therefore if I modify PosePitchDegrees post processing, the value I use to offset of pitch will be relative to this view. For example, if I change pitch to 45 degrees, the viewer will load the image facing up +45 from 0.
This is where InitialView becomes useful because it is not relative to the center of the photo.
The InitialView considers the “real world” axis, that is a level imaginary horizon for roll and pitch and magnetic heading in the case of heading. This is a concept much easier to understand. For example, if I look up 45 degrees from straight ahead, my InitialViewPitch goes from 0 to 45 degrees (however, my PosePitchDegrees is 0 in both examples as the sky as I look up and the view directly in front of me is always in the center of my view).
It is much easier to demonstrate these concepts using examples.
I will use the following photo to demonstrate;
Remember;
- Heading is measured between >= 0 and < 360. Magnetic heading assumes North = 0, East = 90, etc.
- Pitch is measured between >= -90 and <= 90. A positive pitch assumes a downward tilt. A negative pitch assumes an upward tilt.
- Roll is measured between > -180 and <= 180. A positive roll assumes a left tilt. A negative roll assumes a right tilt.
Adjusting Pose
Pose Roll = 90 (roll left)
cp GSAQ3296.JPG GSAQ3296-PoseRollDegrees90.JPG
exiftool -XMP-GPano:PoseRollDegrees=90 GSAQ3296-PoseRollDegrees90.JPG
Pose Roll = -90 (roll right)
cp GSAQ3296.JPG GSAQ3296-PoseRollDegreesMinus90.JPG
exiftool -XMP-GPano:PoseRollDegrees=-90 GSAQ3296-PoseRollDegreesMinus90.JPG
Pose Pitch = 90 (tilt downward)
cp GSAQ3296.JPG GSAQ3296-PosePitchDegrees90.JPG
exiftool -XMP-GPano:PosePitchDegrees=90 GSAQ3296-PosePitchDegrees90.JPG
Pose Pitch = -90 (tilt downward)
cp GSAQ3296.JPG GSAQ3296-PosePitchDegreesMinus90.JPG
exiftool -XMP-GPano:PosePitchDegrees=-90 GSAQ3296-PosePitchDegreesMinus90.JPG
Pose Heading = 180 (South)
cp GSAQ3296.JPG GSAQ3296-PoseHeadingDegrees180.JPG
exiftool -XMP-GPano:PoseHeadingDegrees=180 GSAQ3296-PoseHeadingDegrees180.JPG
Visually this looks identical to the original photo in the viewer. However, look at the compass.
The original photo had XMP-GPano:PoseHeadingDegrees set by default (incorrectly) as 0 (North);

In my updated photo where XMP-GPano:PoseHeadingDegrees = 180;

As you can see Pose is really useful for visually adjusting for pitch and roll. For example, if the camera is rolling, you can use XMP-GPano:PoseRollDegrees to counteract the roll so that the viewer views a level image. Note, XMP-GPano:Pose changes will modify the way a user rotates through the viewer.
Pose is also useful for setting the compass heading of the center, so the user knows the correct direction.
Adjusting InitialView
InitialView Heading = 180 (South)
cp GSAQ3296.JPG GSAQ3296-InitialViewHeadingDegrees180.JPG
exiftool -XMP-GPano:InitialViewHeadingDegrees=180 GSAQ3296-InitialViewHeadingDegrees180.JPG
Notice how the photo now faces backwards to start with versus the original. This is because we are telling the viewer to rotate 180 degrees for the initial view.
Implementing GPano adjustments in GoPro MAX timelapse images
Photos shot on the GoPro MAX in timelapse photo mode has all Pose and InitialView set to 0. Frustratingly GoPro does not consider sensor data to provide InitialView values.
Here is an example to demonstrate…
exiftool -ee -X GSAQ3296.JPG
Which returns the following for these tags;
<XMP-GPano:PoseHeadingDegrees>0.0</XMP-GPano:PoseHeadingDegrees>
<XMP-GPano:PosePitchDegrees>0.0</XMP-GPano:PosePitchDegrees>
<XMP-GPano:PoseRollDegrees>0.0</XMP-GPano:PoseRollDegrees>
<XMP-GPano:InitialViewHeadingDegrees>0.0</XMP-GPano:InitialViewHeadingDegrees>
<XMP-GPano:InitialViewPitchDegrees>0.0</XMP-GPano:InitialViewPitchDegrees>
<XMP-GPano:InitialViewRollDegrees>0.0</XMP-GPano:InitialViewRollDegrees>
And here is what this photo looks like in a photo viewer:
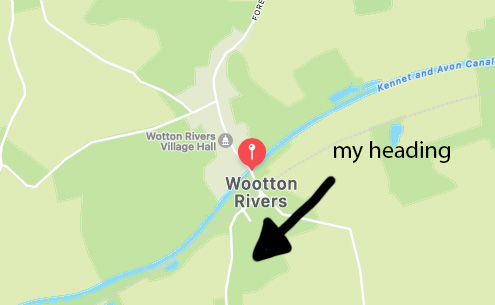
In my image, I estimate the heading, pitch and yaw values to be roughly:
- Heading = 225 degrees (see map below)
- for this I will set
-XMP-GPano:PoseHeadingDegrees=225 - I will not change in
-XMP-GPano:InitialViewHeadingDegreesas the photo is facing the same direction as camera forward already
- for this I will set
- Pitch = 5 degrees (estimate by eye to be tilting downwards)
- for this I will set
-XMP-GPano:PosePitchDegrees=-5 - the reason i am setting -5 (upwards tilt) is to offset the pitch, so that it is level with the imaginary horizon
- I could change
-XMP-GPano:InitialViewPitchDegreesinstead, but this will cause the controls to feel slightly imbalanced against the horizon as the user pans around as they will be moving around from an uneven starting point (which is fixed by adjusting-XMP-GPano:InitialViewPitchDegrees)
- for this I will set
- Roll = -5 degrees (estimate by eye to be rolling right)
- for this I will set
-XMP-GPano:PoseRollDegrees=5 - the reason i am setting 5 (left roll) is to offset the roll, so that it is level with the imaginary horizon
- I could change
-XMP-GPano:InitialViewPitchDegreesagain, but won’t for the same reason as pitch.
- for this I will set
I can write these values like so;
cp GSAQ3296.JPG GSAQ3296-H225P5Rminus5.JPG
exiftool -XMP-GPano:PoseHeadingDegrees=225 -XMP-GPano:PosePitchDegrees=-5 -XMP-GPano:PoseRollDegrees=5 GSAQ3296.JPG GSAQ3296-H225P5Rminus5.JPG
And here are what the adjustments look like;
The changes are minor, but offer some improvements in usability when panning around the image. The greater the roll or pitch, the greater the improvements such adjustments will make.
A real world example
Occasionally I point the camera in the wrong direction on my mount.
Here is such an example;
These images are problematic if using a crude way to determine heading (calculating the heading to the next photo, not the true heading of the camera).
In Trail Maker, a user can define if the camera was facing backwards whilst shooting. If set to true, then two values are calculated;
- The calculated heading to next photo
- The calculated heading of the camera (calculated using;
calculated heading to next photo - 180 degreesin degrees.
e.g. if user sets camera facing backwards to true and the calculated heading to next photo is 10 degrees, but the calculated heading of the camera will be 190 degrees.
The corresponding GPano tags would be XMP-GPano:PoseHeadingDegrees=190 (the real heading) and -XMP-GPano:InitialViewHeadingDegrees=180 (to spin the viewer 180 degrees to get it facing towards the next photo).
Using GSpherical tags 360 video
You can see the full Google Spherical video (v1) specification here: https://github.com/google/spatial-media/blob/master/docs/spherical-video-rfc.md
It is very similar to GPano, but it does not contain Pose tags. This is simply because videos are 100’s of frames. Given the nature of film making the heading, roll, and pitch will almost always change many times in a video.
Therefore only InitialView tags are accessible to set the orientation of the video on viewer load in the videos global metadata (not in a metadata stream like CAMM).
Let me show you an example. Here is a video shot in World Lock on the MAX.
Looking at the metadata:
exiftool -X GS010013-worldlock.mp4
 <XMP-GSpherical:Spherical>true</XMP-GSpherical:Spherical>
 <XMP-GSpherical:Stitched>true</XMP-GSpherical:Stitched>
 <XMP-GSpherical:StitchingSoftware>Spherical Metadata Tool</XMP-GSpherical:StitchingSoftware>
 <XMP-GSpherical:ProjectionType>equirectangular</XMP-GSpherical:ProjectionType>
 <XMP-GSpherical:Spherical>true</XMP-GSpherical:Spherical>
 <XMP-GSpherical:Stitched>true</XMP-GSpherical:Stitched>
 <XMP-GSpherical:StitchingSoftware>Spherical Metadata Tool</XMP-GSpherical:StitchingSoftware>
 <XMP-GSpherical:ProjectionType>equirectangular</XMP-GSpherical:ProjectionType
You can see there are only the essential GSpherical tags to ensure it is loaded correctly in the viewer.
Let me now adjust the heading by 180 degrees so that it faces the other way in the viewer (before the user pans) – I will use Google’s Spatial Media Metadata Injector for this.
The Spatial Media Metadata Injector does not support the addition of any IntialView tags by default. As a quick hack for this demo, I simply modified the metadata_utils.py file to include a hardcoded tag with <GSpherical:InitialViewHeadingDegrees>180</GSpherical:InitialViewHeadingDegrees> (see line 51). Once I updated this file, I ran the tool like so;
cp GS010013-worldlock.mp4 GS010013-worldlockInitialViewHeadingDegrees180.mp4
python spatialmedia -i GS010013-worldlock.mp4 GS010013-worldlock-out.mp4
Which produces a new video (GS010013-worldlock-out.mp4) with metadata;
exiftool -X GS010013-worldlock-out.mp4
 <XMP-GSpherical:Spherical>true</XMP-GSpherical:Spherical>
 <XMP-GSpherical:Stitched>true</XMP-GSpherical:Stitched>
 <XMP-GSpherical:StitchingSoftware>Spherical Metadata Tool</XMP-GSpherical:StitchingSoftware>
 <XMP-GSpherical:ProjectionType>equirectangular</XMP-GSpherical:ProjectionType>
 <XMP-GSpherical:InitialViewHeadingDegrees>180</XMP-GSpherical:InitialViewHeadingDegrees>
Note, Spatial Media Metadata Injector actually removes XMP-GSpherical:Spherical and XMP-GSpherical:Stitched tags during processing (as these are also not supported in the default version).
And the video itself;
Voila, it is now loaded in the viewer facing backwards (compared to the original).
We're building a Street View alternative for explorers
If you'd like to be the first to receive monthly updates about the project, subscribe to our newsletter...
